Granite Processing - Batch 2
Processing method and initial results for the second batch of granite are presented.


The initial milled "batch" of granite, Batch 1 consisted of a number of individual batches that all produced a number of successful glazes. They also exhibited a fair amount of variability in results when adding cobalt carbonate to the base glaze, which sometimes produced a blue glaze (expected) and sometimes a green glaze (unexpected in an oxidation environment).
Experimentally it was discovered the accidental blue-green variability was due to variations in the amount of natural iron from the granite contained in each batch (A lab test confirms a sample of the hillside Inverness granodiorite contains ~4% iron oxide.). The tests confirmed as well that the blue-green interface can be controlled to a degree by introducing the right amount of cobalt and iron to the base glaze (something we'll confirm again in the results presented below).
As of the end of 2025, the first round of millings, Batch 1, is nearly used up (no raw material is left), necessitating the creation of more processed granite.
The goal of production for the "second" batch, Batch 2, is to refine the milling process and to produce a larger quantity of material that can be mixed together entirely and thoroughly, making it consistent. Iron is naturally present in the granite and cannot be avoided, but larger production runs should even out its concentration variation in the rocks collected and processed. That's the hypothesis anyway.
Batch 2 was processed as follows:
- Mill calcined granite to pass through a 6mm sieve as described here.
- Ball Mill this output in a 5 liter porcelain vessel using 2.5 liters of charge and 2.5 liters of water for 8 1/4 hours. Sieve at 60M and dry, hold the residual aside. Repeat.
- When 2 liters of residual has been collected, mill that by itself with 2.5 liters of water for 12 hours. Sieve at 60M and dry, and discard any residual.
- Continue until about 15 kilos of dried material is processed. Then combine it altogether in a cauldron large enough to mix it thoroughly.
The table below shows the progression taken (starting 5/19/25 and finishing 6/5/21). Just under 14 kilos (~31 pounds) of dried crushed granite was produced.
| Run | Material | Residual (ml) | Residual (%) | Notes |
|---|---|---|---|---|
| 1 | Granite | 725 | 36 | |
| 2 | Granite | 1000 | 50 | |
| 3 | Residual | 100 | 5 | Just a few larger chunks left over |
| 4 | Granite | 1000 | 50 | |
| 5 | Residual | 100 | 5 | Just a few larger chunks left over |
| 6 | Granite | 1200 | 60 | |
| 7 | Granite | 25 | 1 | Milled > 12 hrs, timer broke |
| 8 | Granite | 25 | 1 | Milled > 12 hrs, no timer |
| 9 | Granite | 25 | 1 | Milled > 12 hrs, no timer |
| 10 | Granite | 25 | 1 | Milled > 12 hrs, no timer |
Obviously things did not go accordingly to plan towards the end. Milling typically is performed over night and when the shut off timer broke, milling continued past 8 hours. So I called an audible and kept going since it was going to take some time to obtain a new timer.
A goal of the milling process is to capture as much of the granitic material as possible without over milling. Over milling can cause the loss of some important material, especially the feldspars, which are our fluxes. This said, what constitutes over milling in my situation is unknown.
The reprocessing the residual seems like good discovery as we are able to mill most of the charge in two passes, crushing and capturing the softer material in the first pass and then the harder material in the second pass. But when the timer broke, we achieved a similar result by just milling longer. Which is better? Without further testing I will assume the original plan is "safer".
Initial Glaze Tests
A few exploratory tests have been performed to date using Batch 2.
A base glaze was formulated using 70% Batch 2, 30% Wollastonite and 4% Zinc Oxide (67%, 29%, 4%). This typically produces a glassy version of the base granite glaze. The Kline No Controlled Cooling firing schedule was used.
Test 1 - Cobalt + Iron Gradients
Tests on Nara 5 (Porcelain), Sedona Red and Sienna Red (Mt Vision sourced) test tiles are shown below.
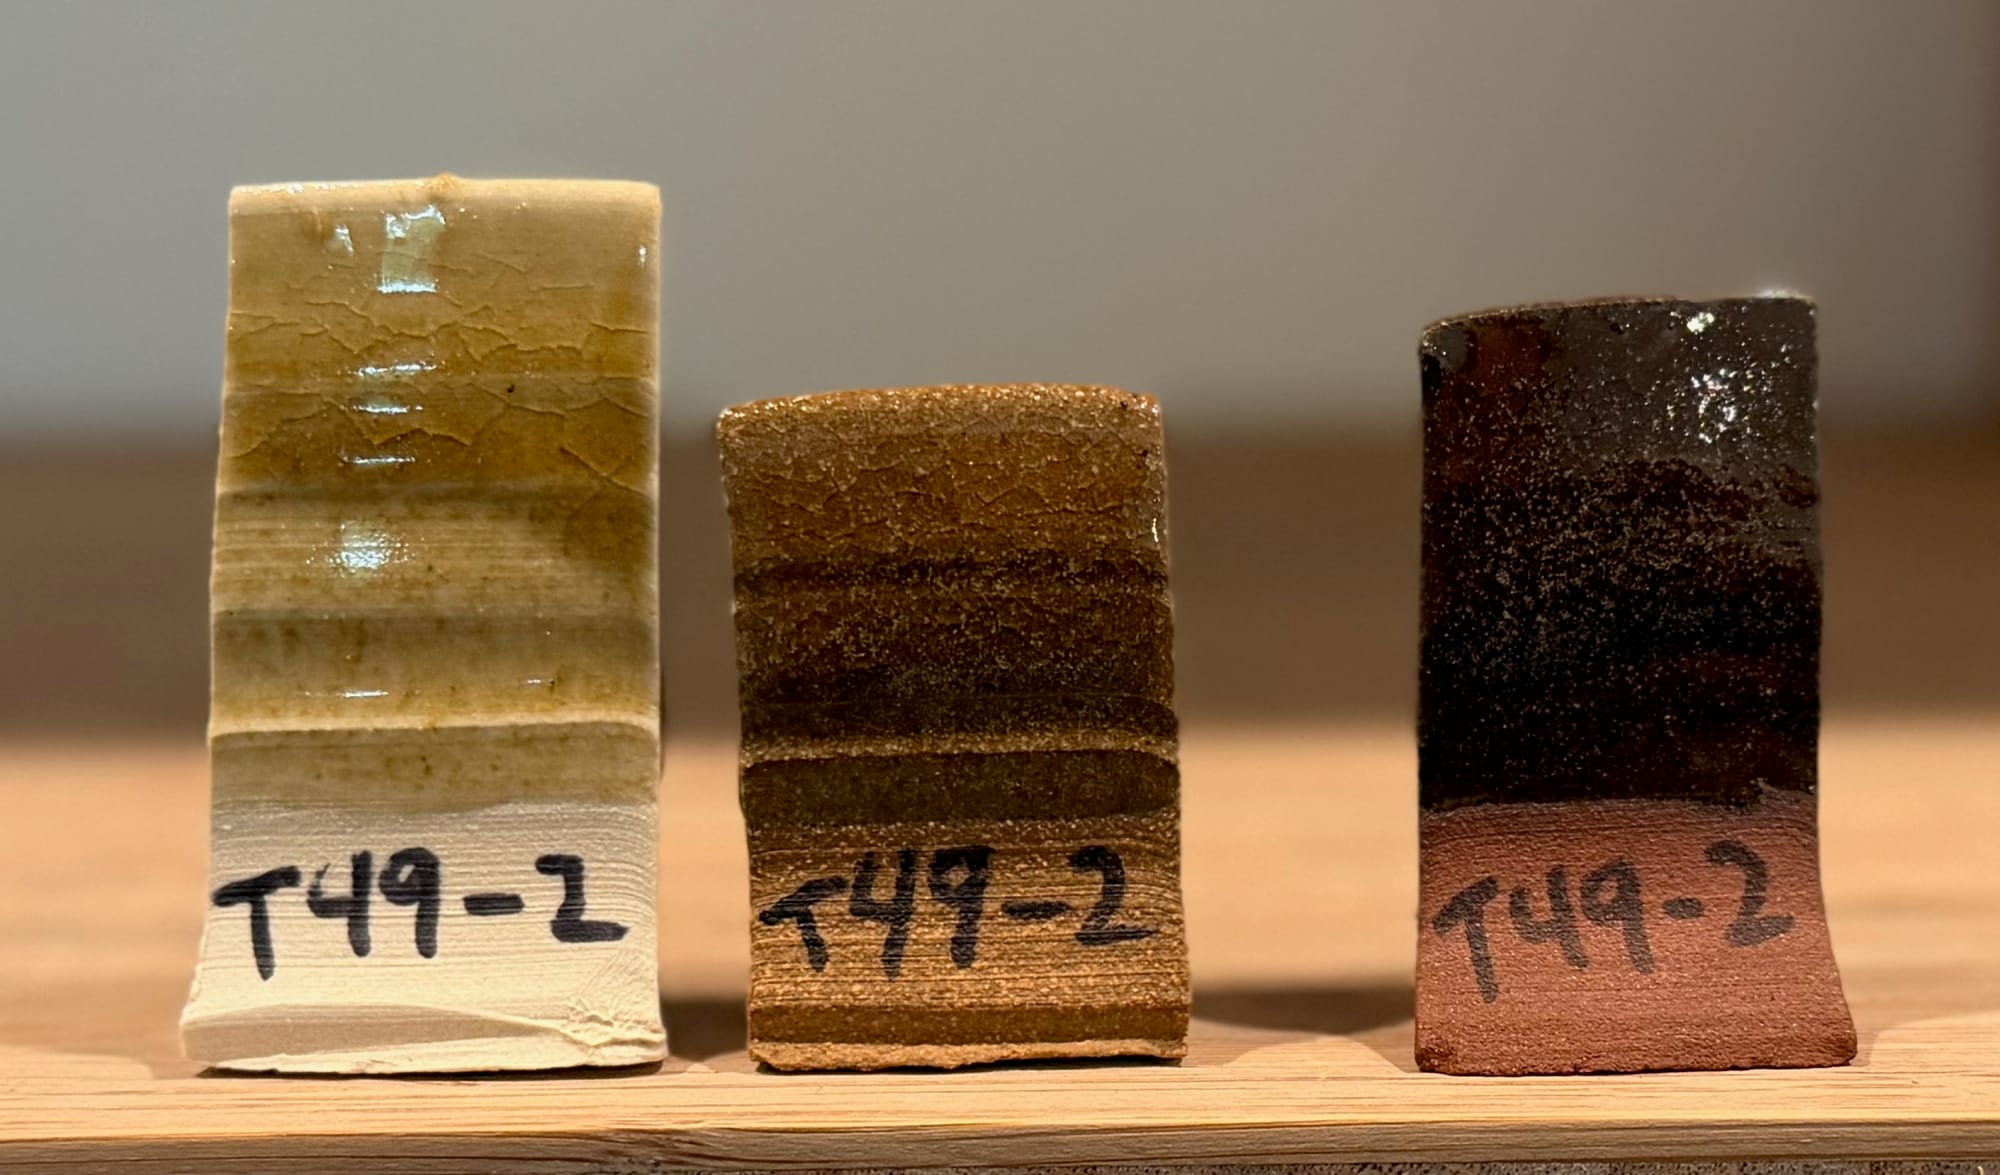
If the results of Batch 2 equaled Batch 1 that would a welcome result, and this seems to be the case. See Base Glaze C in this article for a comparison.
The pictures do not do the glaze justice. It's a fully melted, glassy glaze. A rich glaze is observed on all three tiles, with some micro-crystals forming on the iron based red clays. Crazing is present.
The next test is a gradient progression using the same base recipe and Cobalt Carbonate. The progression is 0.25%, 0.5%, 0.75%, 1.0% and 1.25%. Most uses to date have been 0.5%.
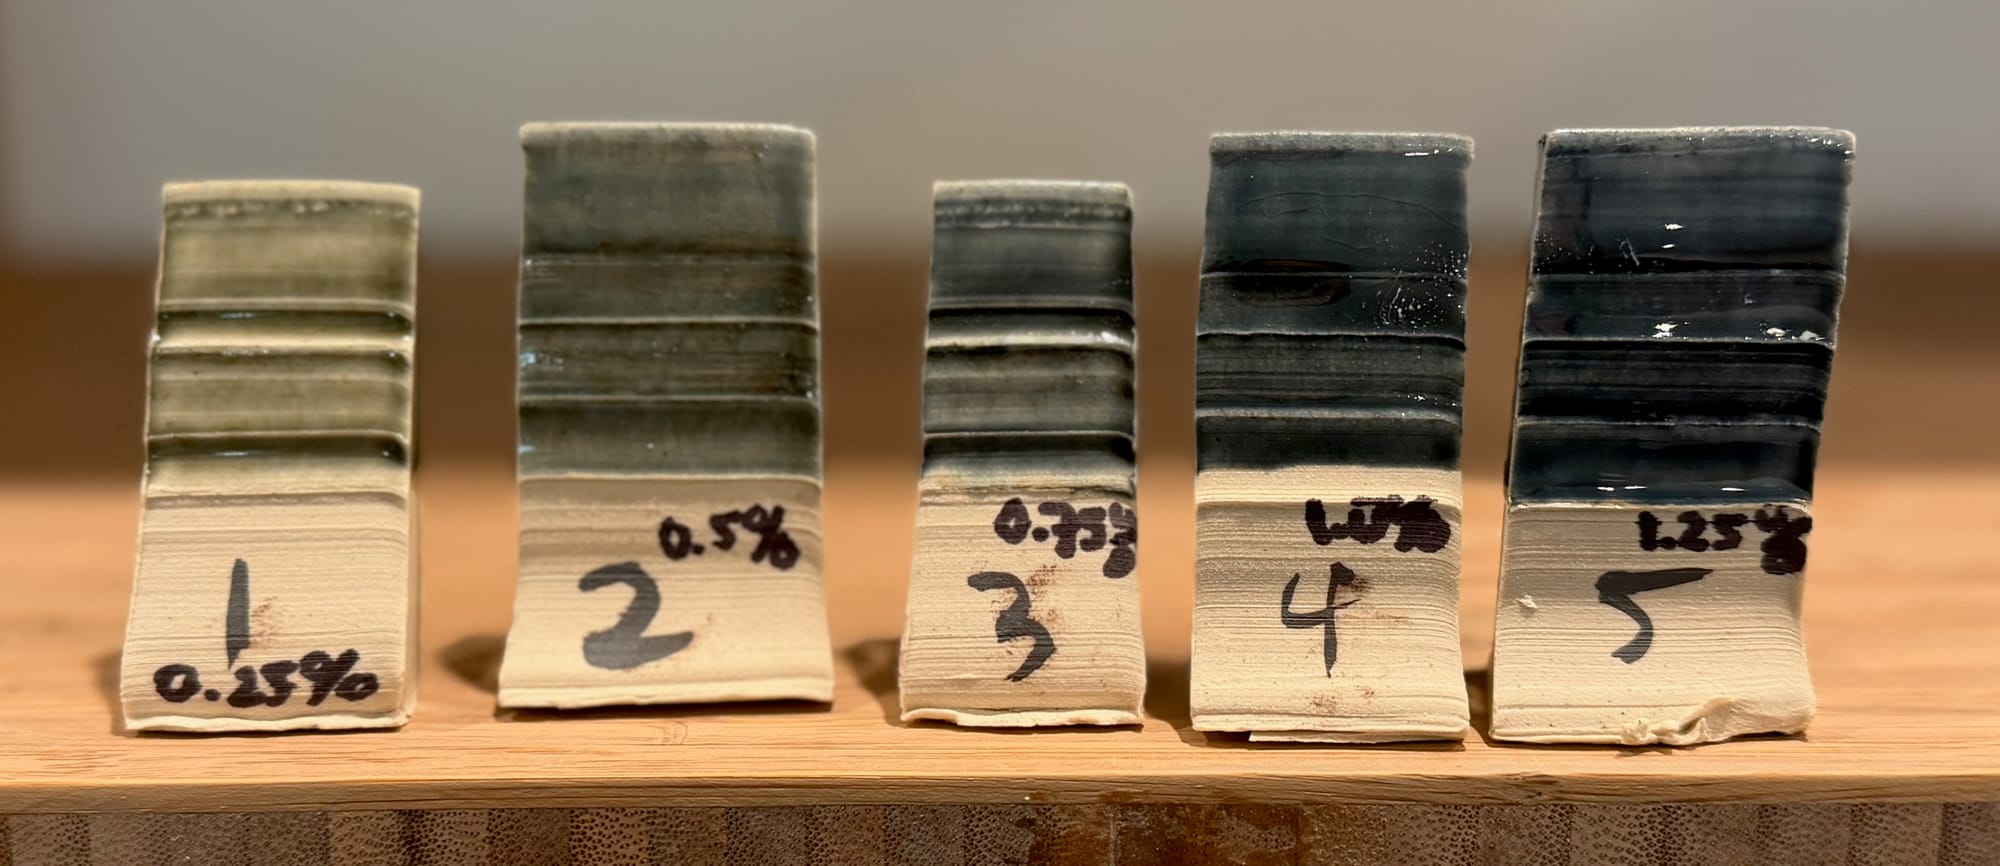
This also produces results similar to those produced with Batch 1. Crazing persists. Refer to Base Glaze C in this article for one comparison and this article for others. What this test provides finer sample intervals between 0% and 1% than we have seen previously.
The final test presented is a gradient progression beginning with Test Tile 1 above, 0.25% Cobalt Carbonate and blending Red Iron Oxide (ROI) in concentrations of 0%, 0.25%, 0.5%, 0.75% and 1.0%.
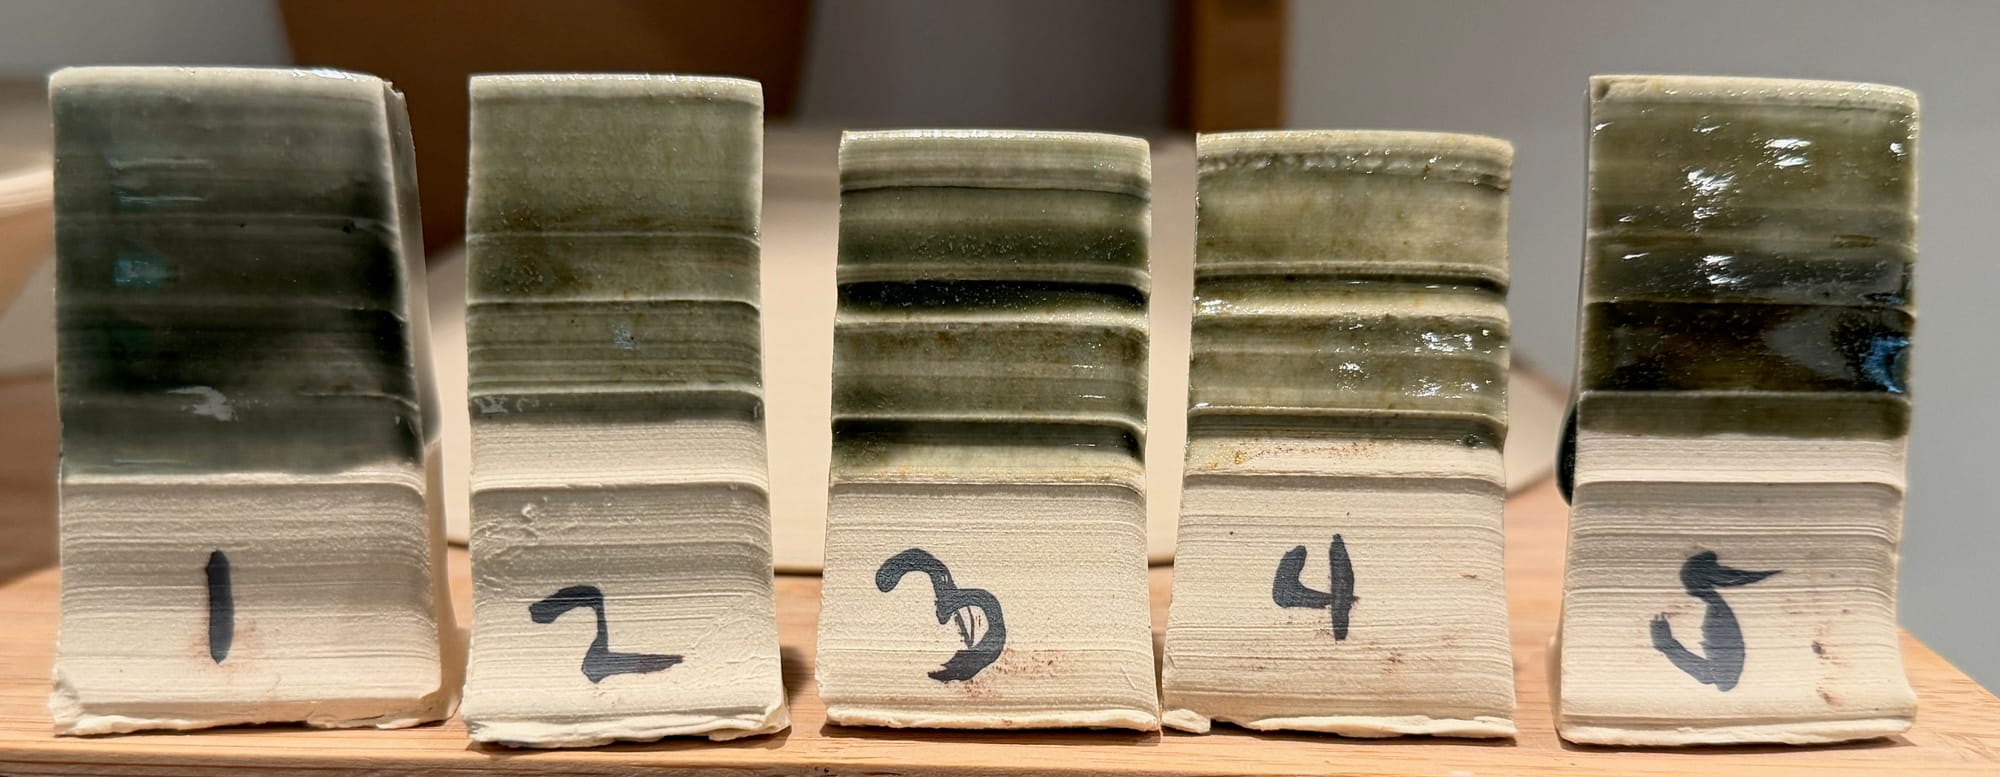
Results similar to Batch 1 are obtained once again. Crazing persists but decreases as iron is added. Test Tile 4, 0.25% Cobalt Carbonate and 1% Red Iron Oxide corresponds chemically to results shown here.
Test 2 - Cobalt + Iron Gradients Expanded
The above tests were performed again and extended. Overall, the glaze is fully melted, glassy, exhibits micro crystals where thicker and crazes. The Batch 2 results remain similar to Batch 1. A number of these tiles are attractive and worth perusing or continuing to peruse.
The tests also tease out the blue-green interplay between the natural iron contained in the granite with the introduced ROI and Cobalt Carbonate.
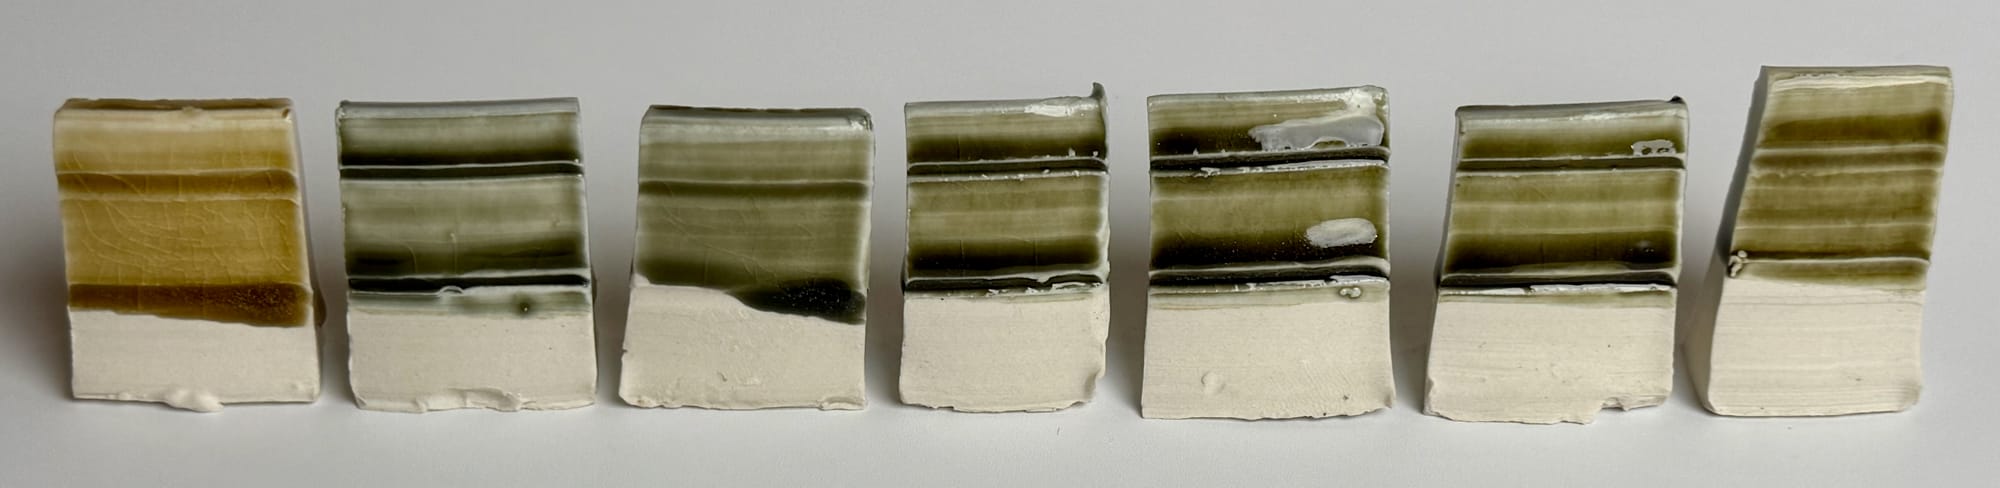
Below repeats the gradient of ROI using a the base glaze with 0.5% Cobalt Carbonate added.
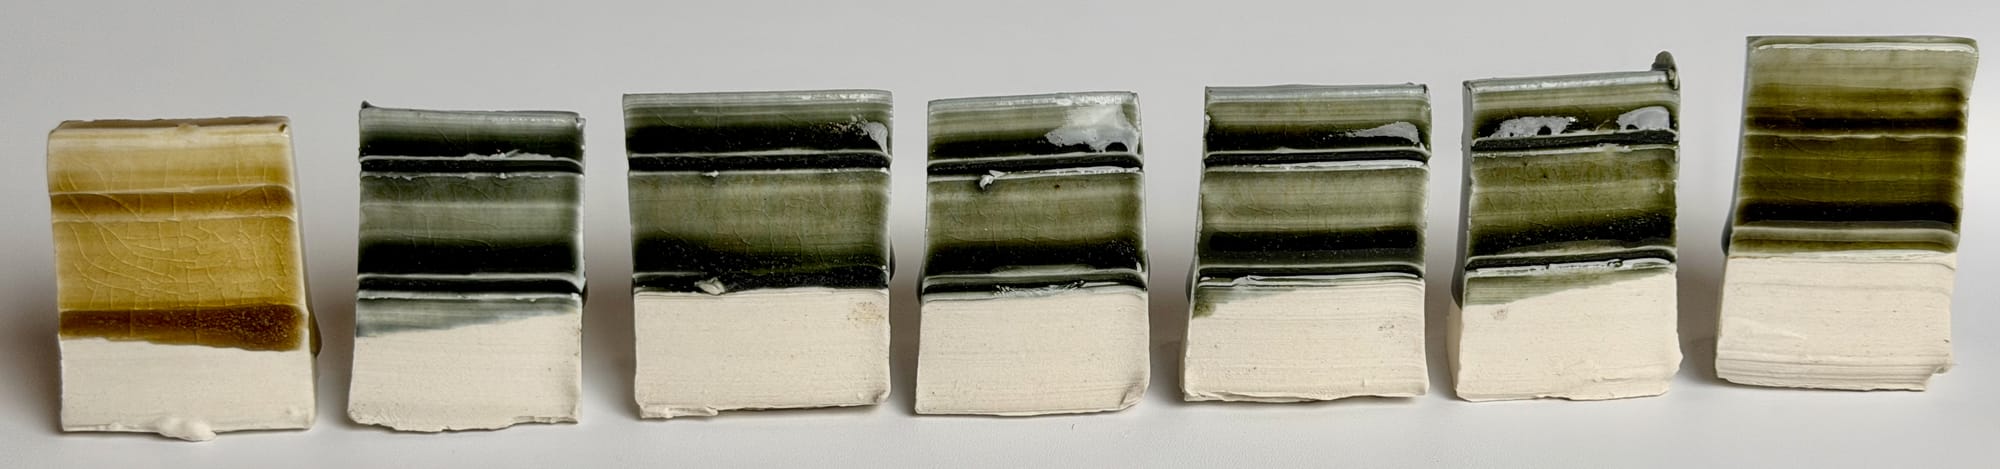
Moving left to right, Tiles 1 is the base glaze, Tiles 2-7 are base + 0.5% Cobalt Carbonate. The ROI gradient also covers Tiles 2-7 at 0, 0.25, 0.50, 0.75, 1.0 and 2.0%. Tile 2 is blue-green and progressively moves to green-blue by Tile 6. Tile 6 at 0.5% Cobalt Carbonate and 1.0% ROI corresponds to our current canonical "Green Celadon". By Tile 7 the ROI starts to become dominant.
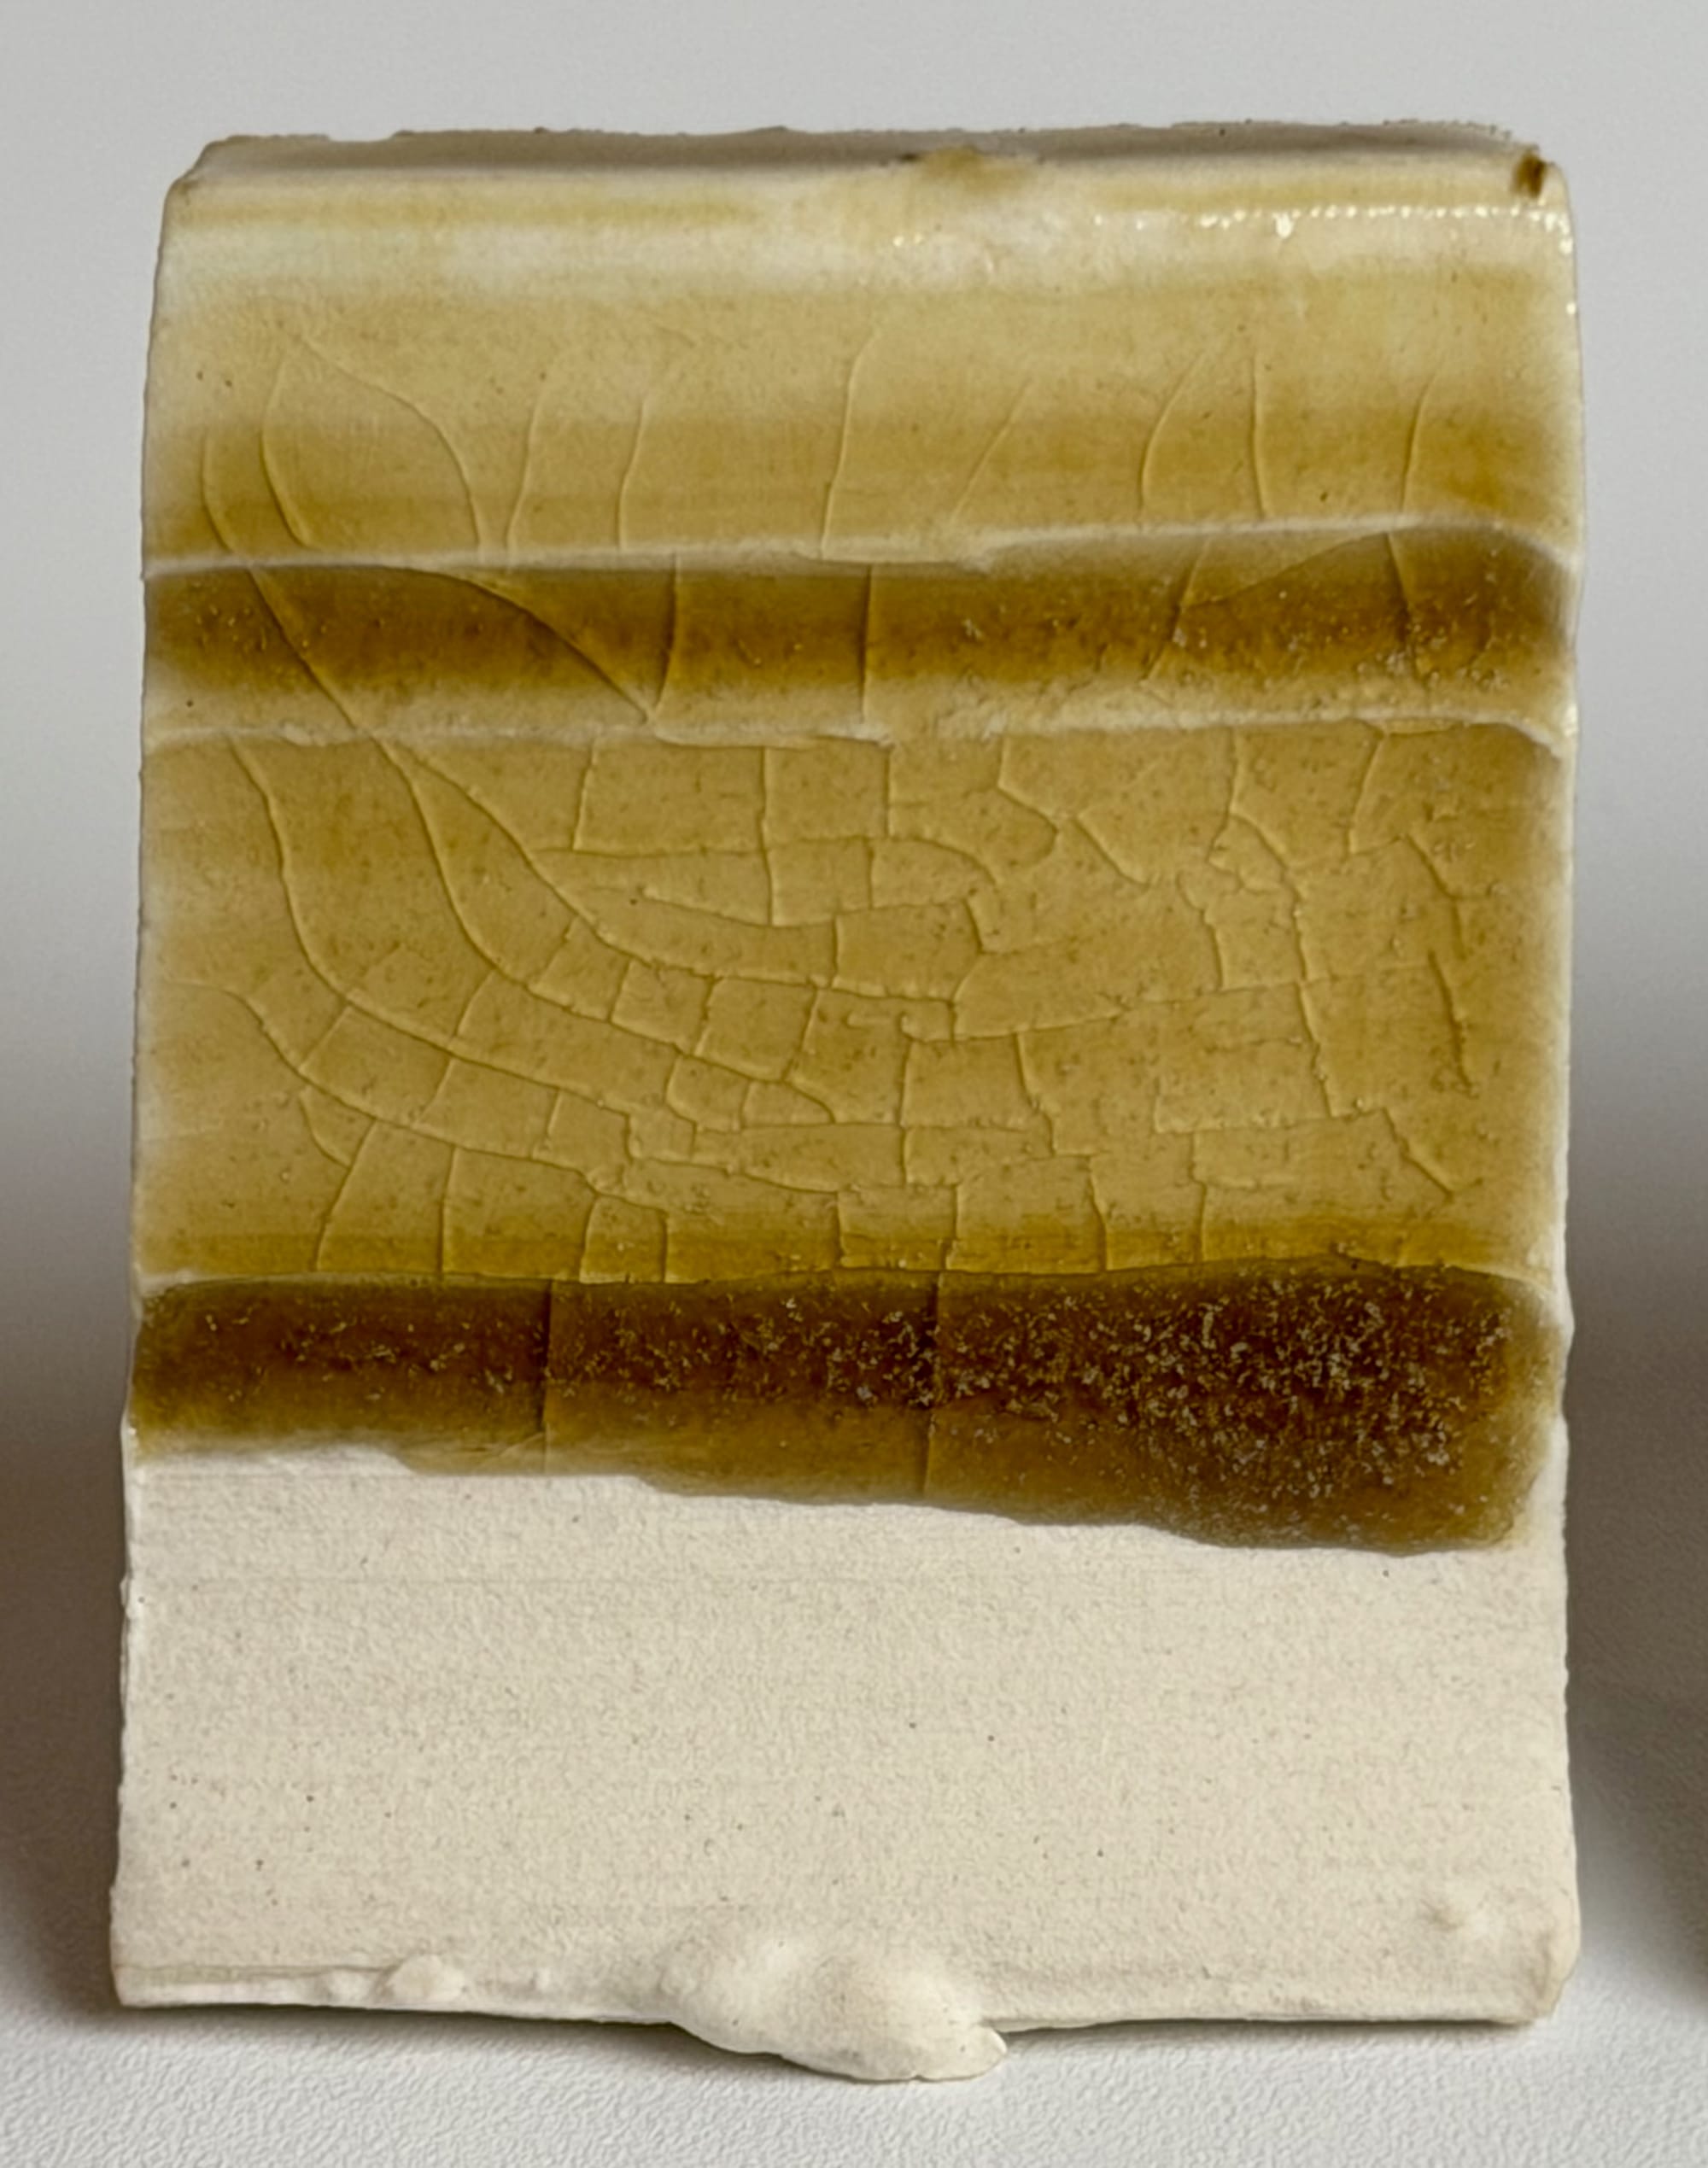
The base glaze (above, Tile 2) is particularly pretty in this example being a honey-yellow and shows micro crystal development in its thicker regions.
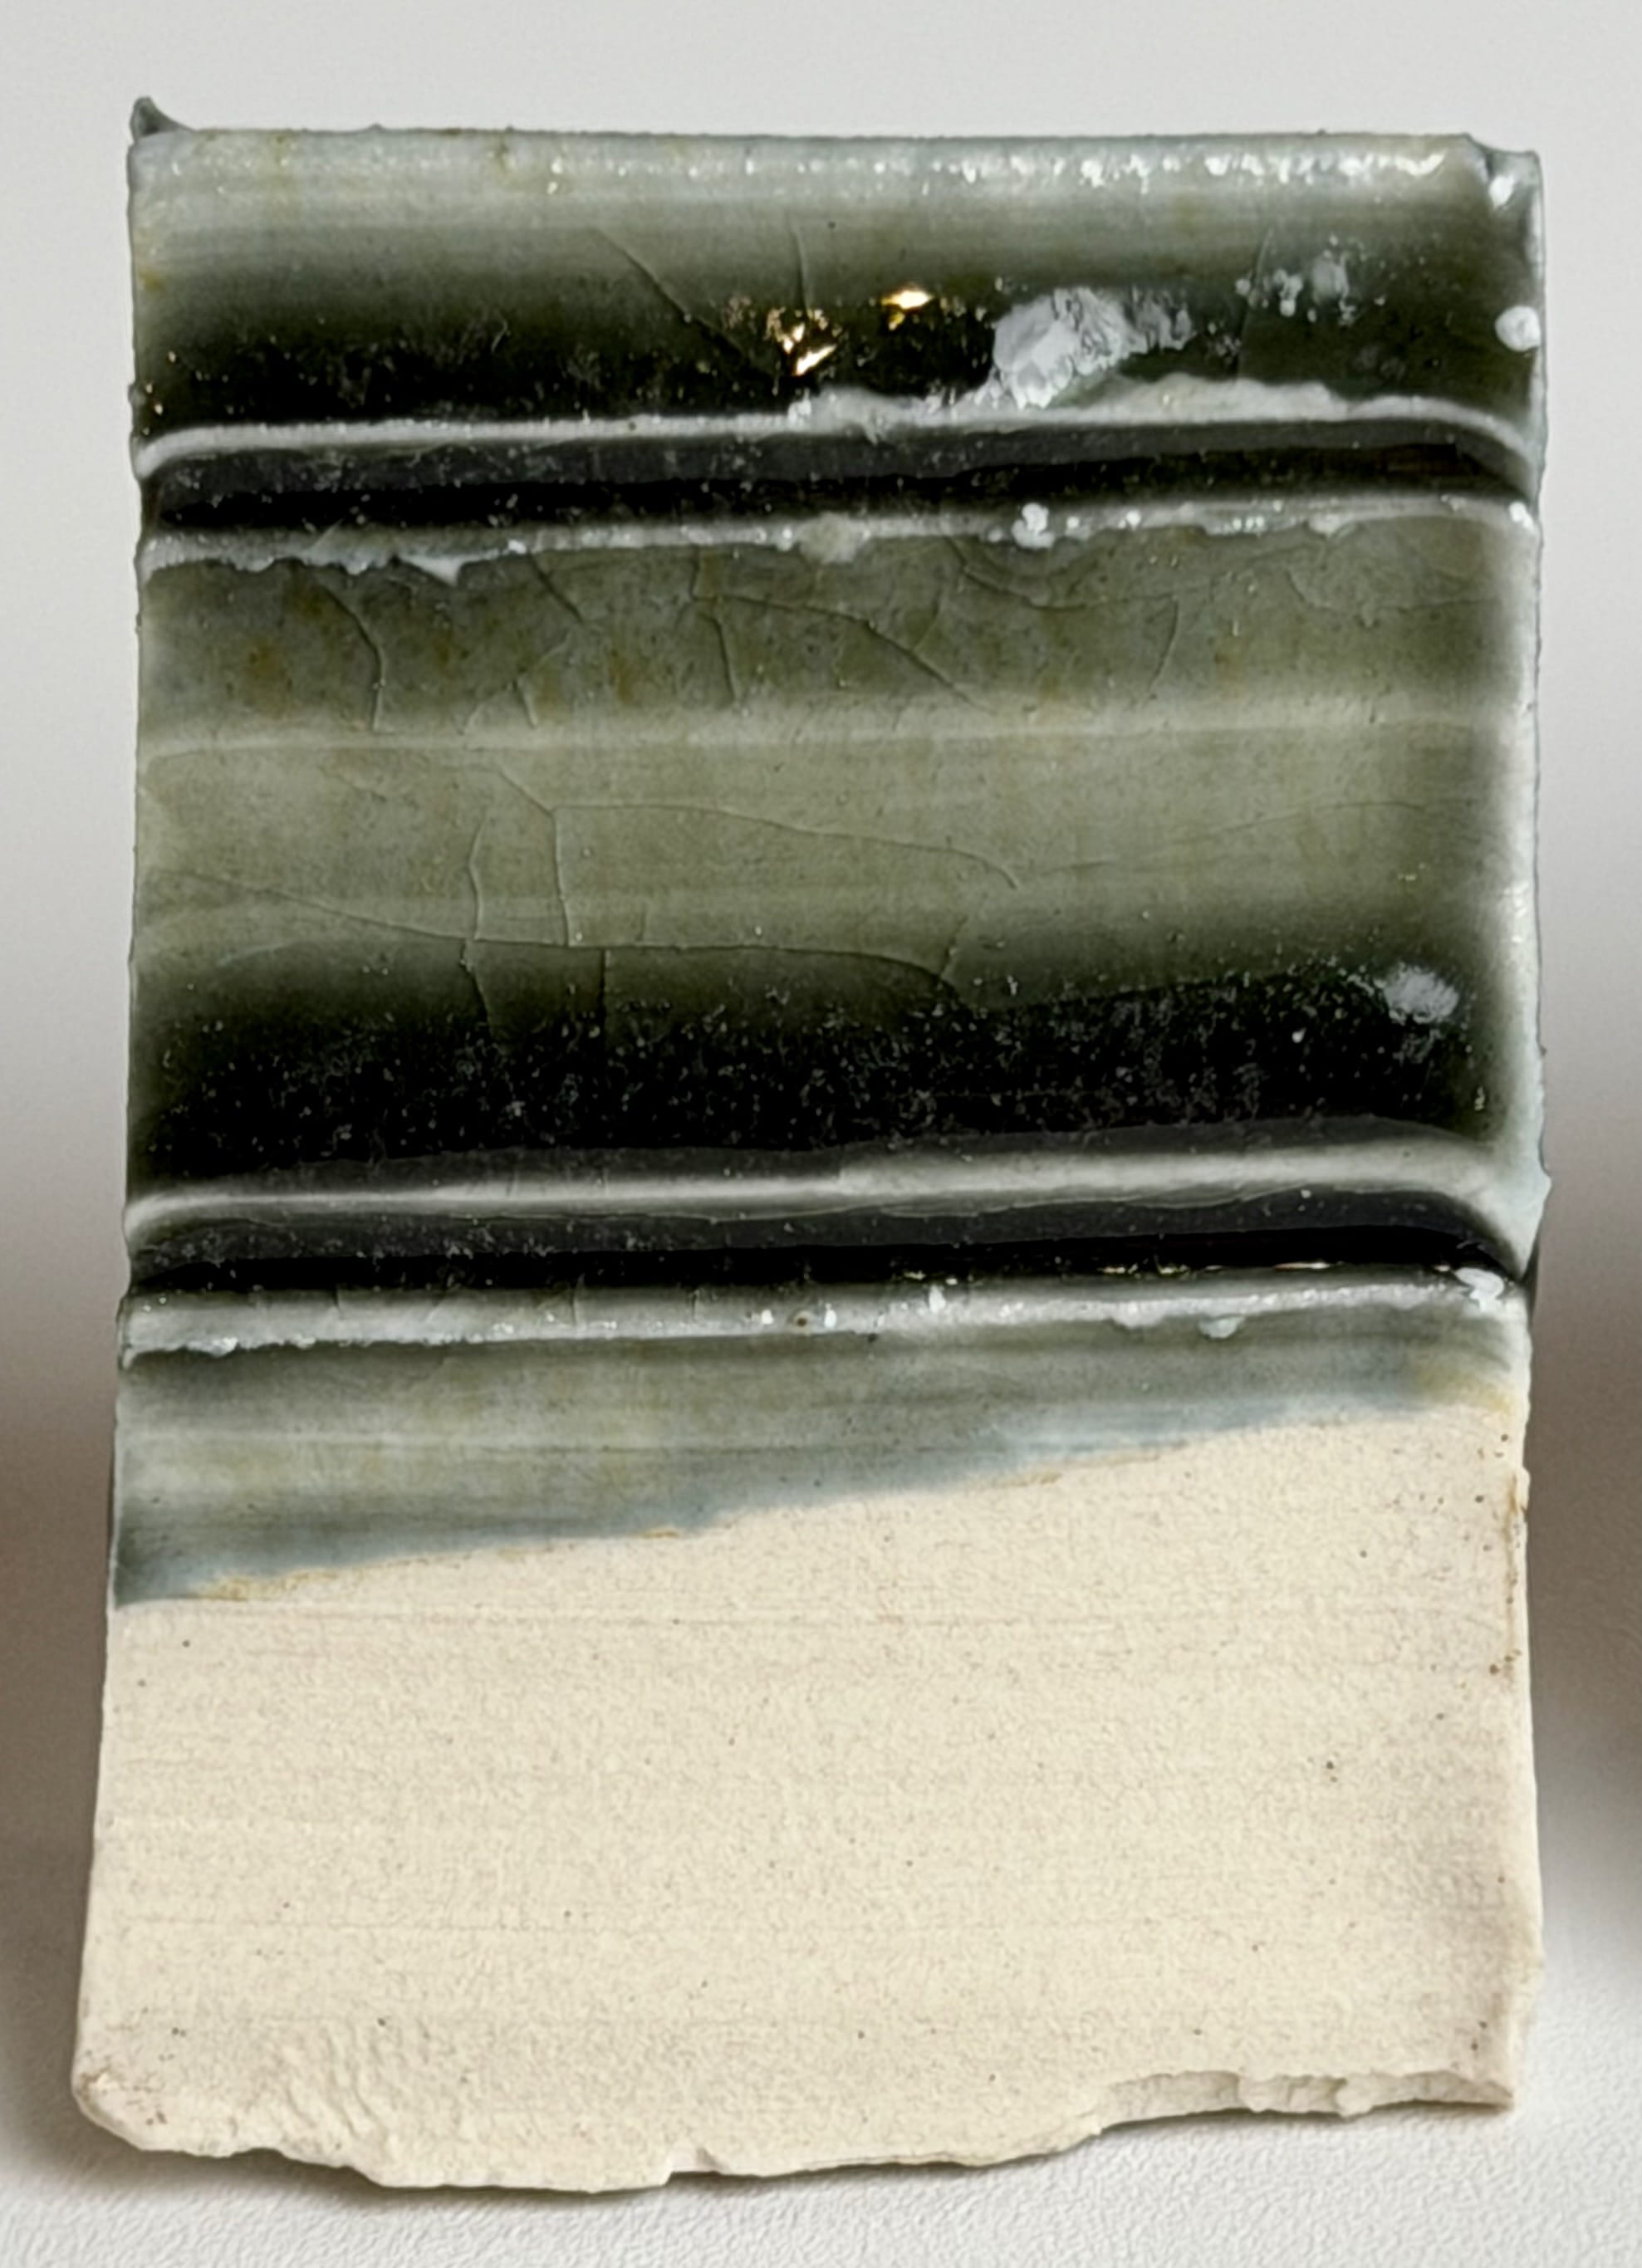
Tile 2, Base + 0.5% Cobalt Carbonate is shown above. It's blue, especially where thicker but exhibits hints of green due to the natural iron content of the granite. Micro crystal development is apparent.
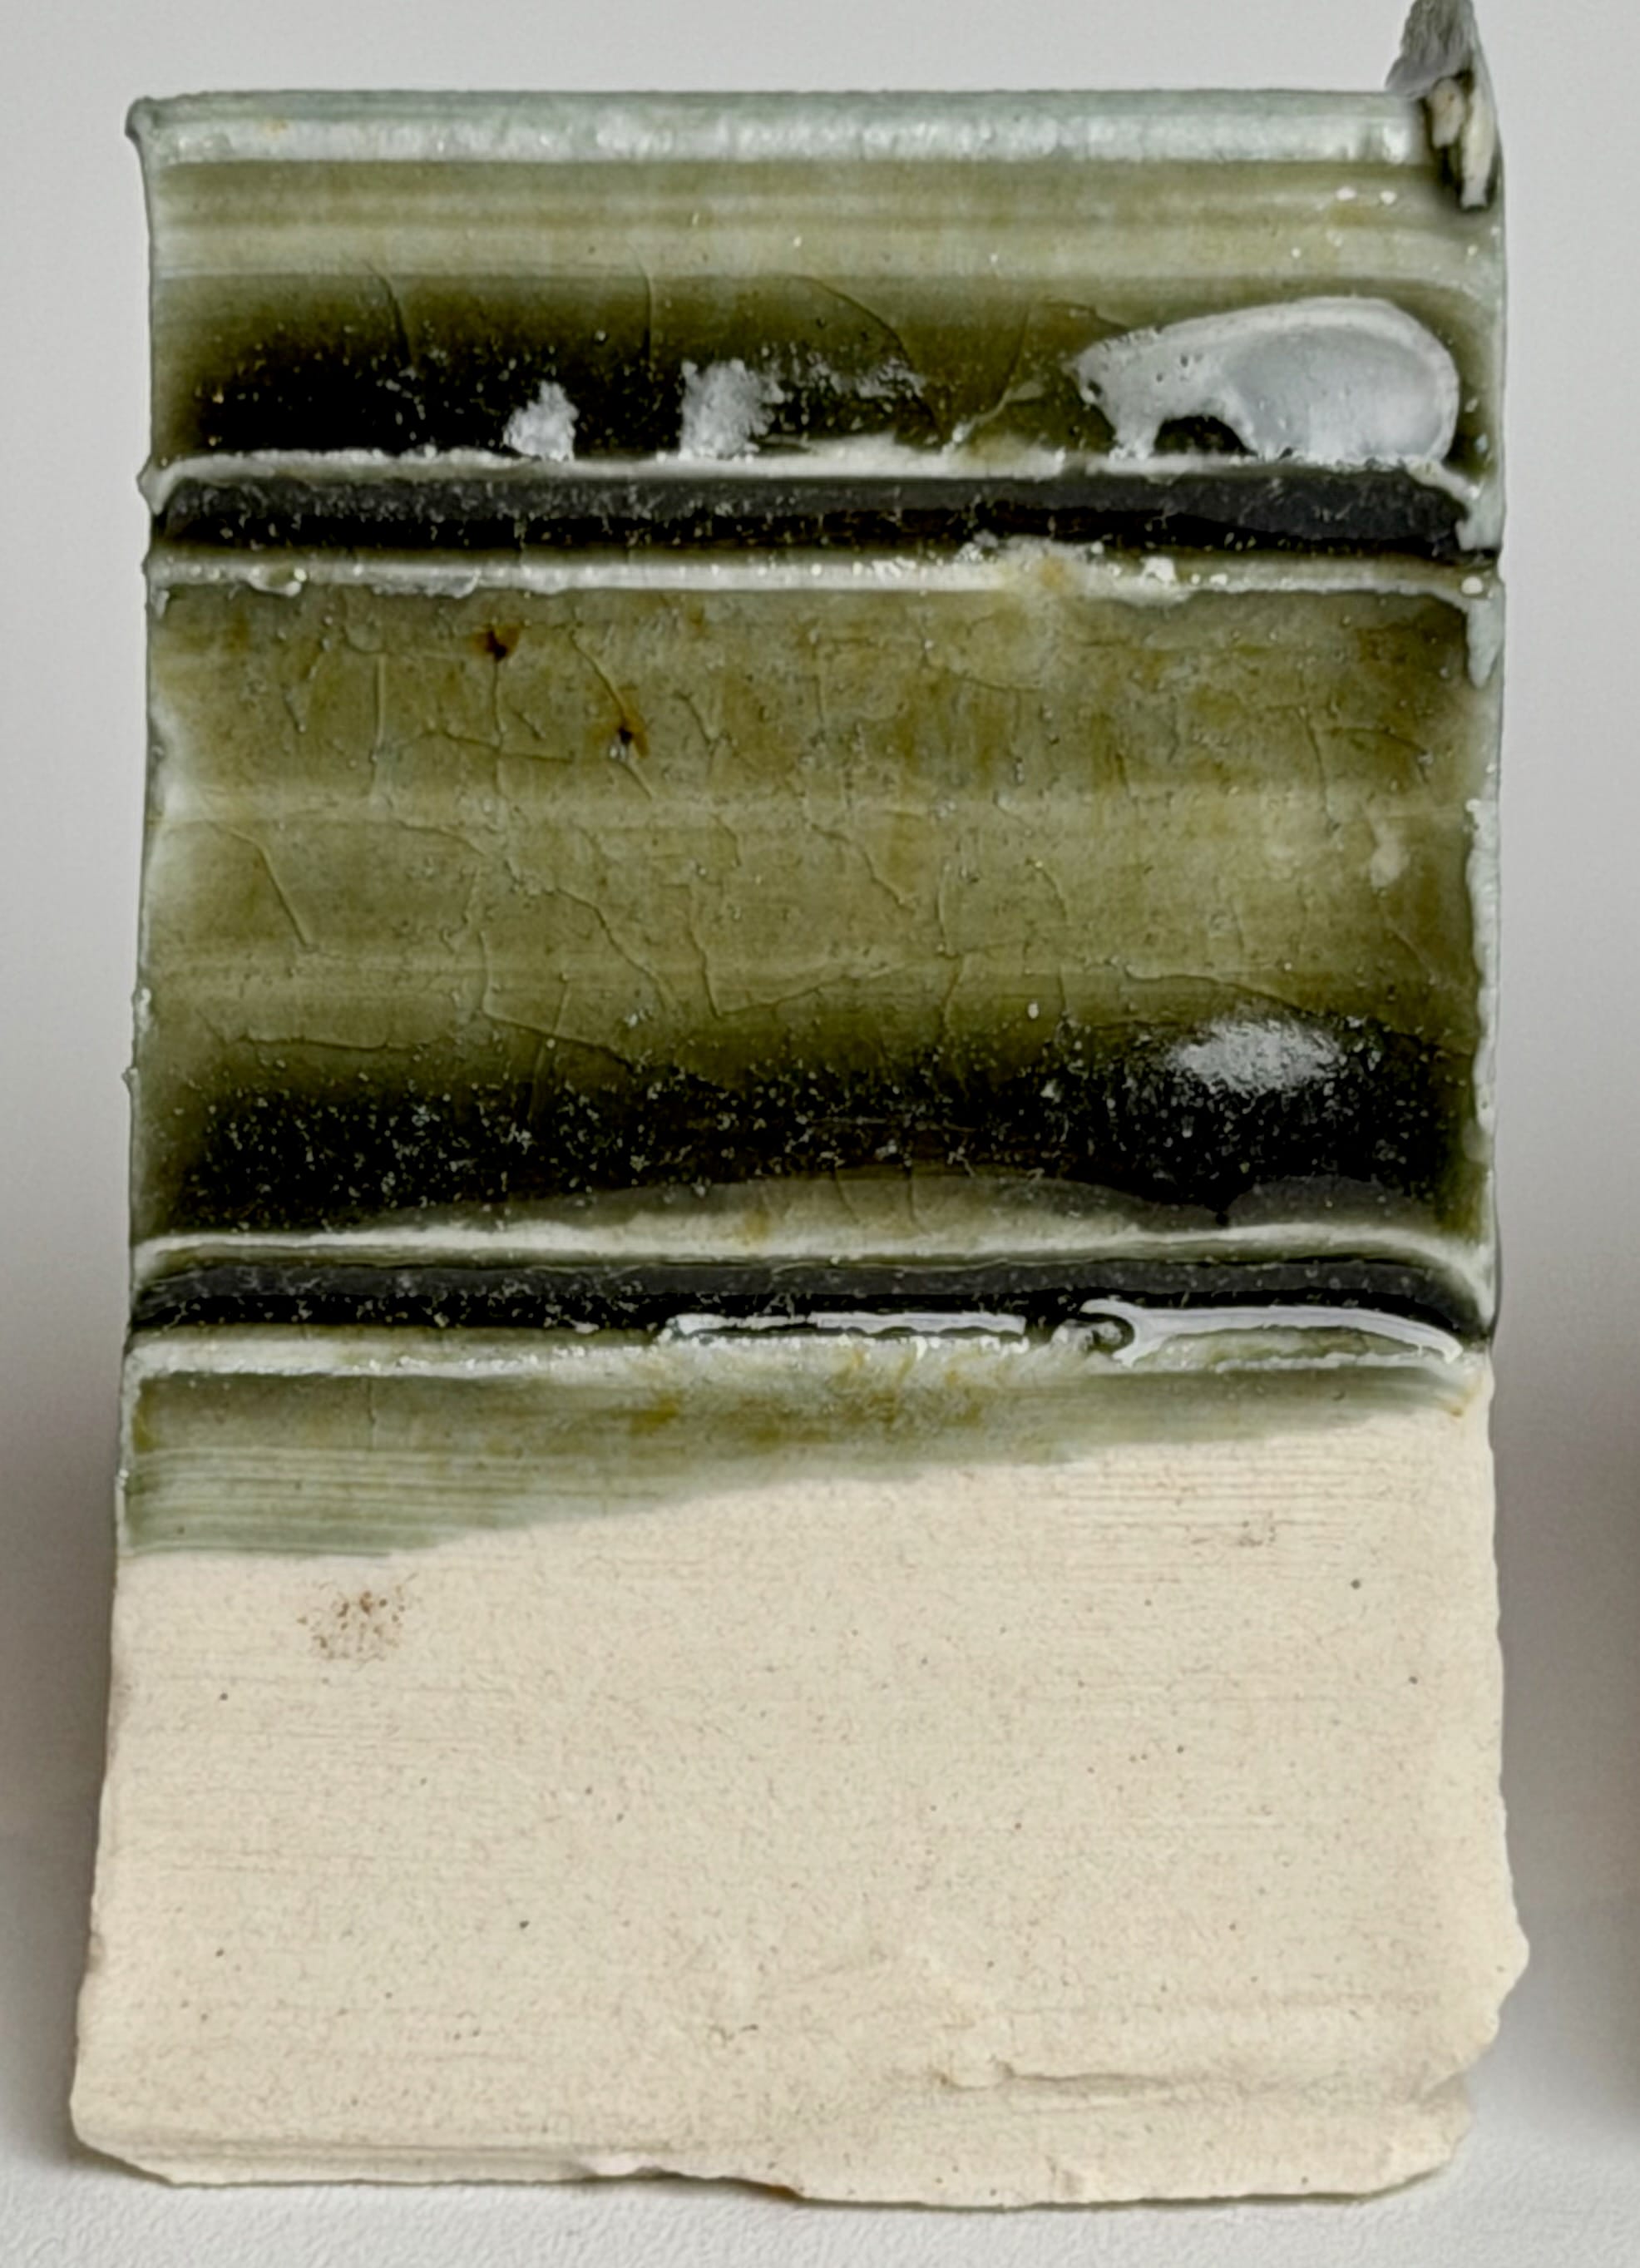
Tile 6 (above) is the base glaze + 0.5% Cobalt Carbonate + 1.0% ROI. The colors have flipped from blue to green, with hints of blue remaining.
In the next test (below), the prior one is repeated with 0.25% Cobalt Carbonate instead of 0.5%.
In this case the blue-green balance shifts left, with Tile 2 already exhibiting more green (below).
Interestingly, crazing seems less severe and micro crystals are less developed than its 0.5% Tile 2 counterpart.
Looking at Tile 6, 0.25% Cobalt Carbonate and 1.0% ROI, we observe an olive hue with browns emerging from the thicker areas as the ROI becomes dominant faster than with the 0.5% Cobalt Carbonate set, as would be expected. Crazing seems lighter again and we see hints of micro crystals.
The final gradient (below) repeats the test once more with 0.1% Cobalt Carbonate instead of 0.25% and 0.5%.
In this case the green hues are quite subdued with both the natural iron oxide and the introduced ROI dominating. Tile 7, 2% ROI, is well on its way to a familiar Tenmoku.
Tile 2 (above), 0.1% Cobalt Carbonate and no ROI is now dominated with browns, though hues of green are still detectable.
By Tile 6, 0.1% Cobalt Carbonate + 1.0% ROI the cobalt is completely dominated and the glaze is brown.
Test 3 - Crazing
The tests presented thus far using the base formulation with zinc oxide, Base-Z, all exhibit crazing on the Nara 5 Porcelain (and other clays as well). A different, often used, studio granite base glaze formulation, Base-S, that adds silica instead of zinc oxide, produces a functional matte glaze that does not exhibit crazing (Granodiorite 70%, Wollastonite 30% and Silica 10% (or 64%, 27%, 9%)).
A line blend using these two formulations was conducted in an attempt to find a balance where a melted, glassy glaze that does not craze could be produced (below, Base-S left and Base-Z right).

Unfortunately nothing immediately conclusive was obtained, as we'll see below.
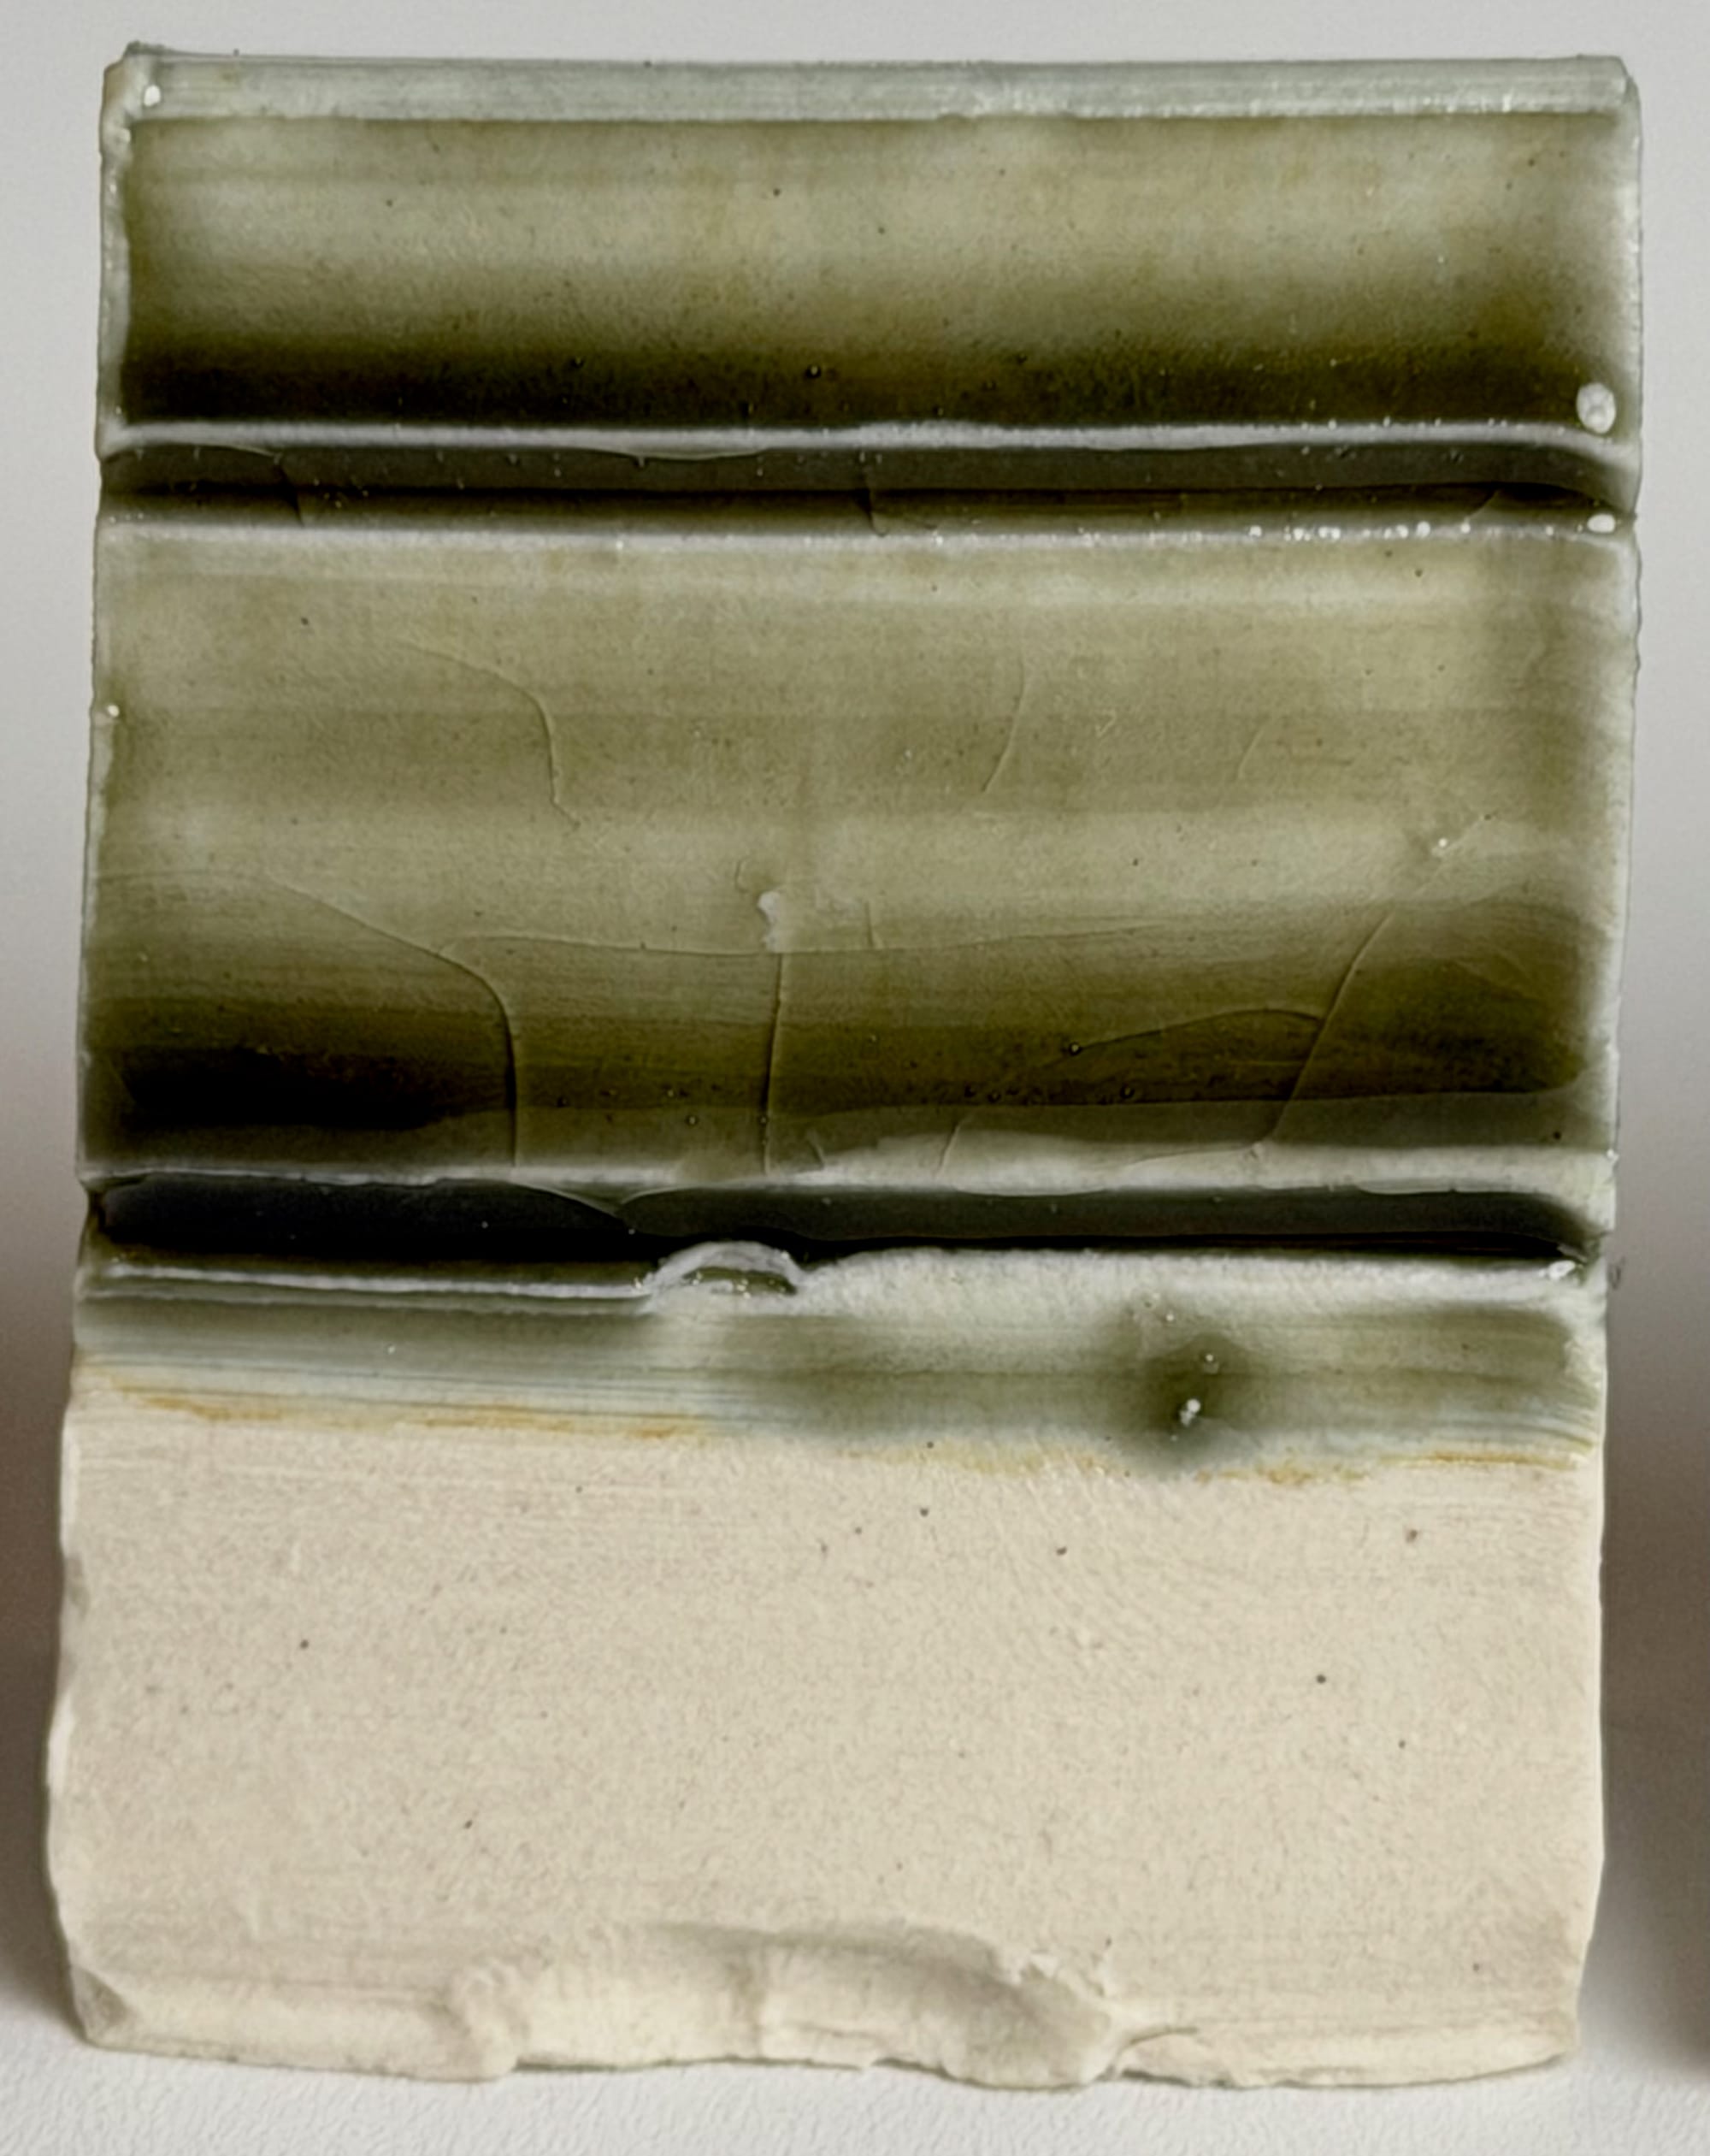
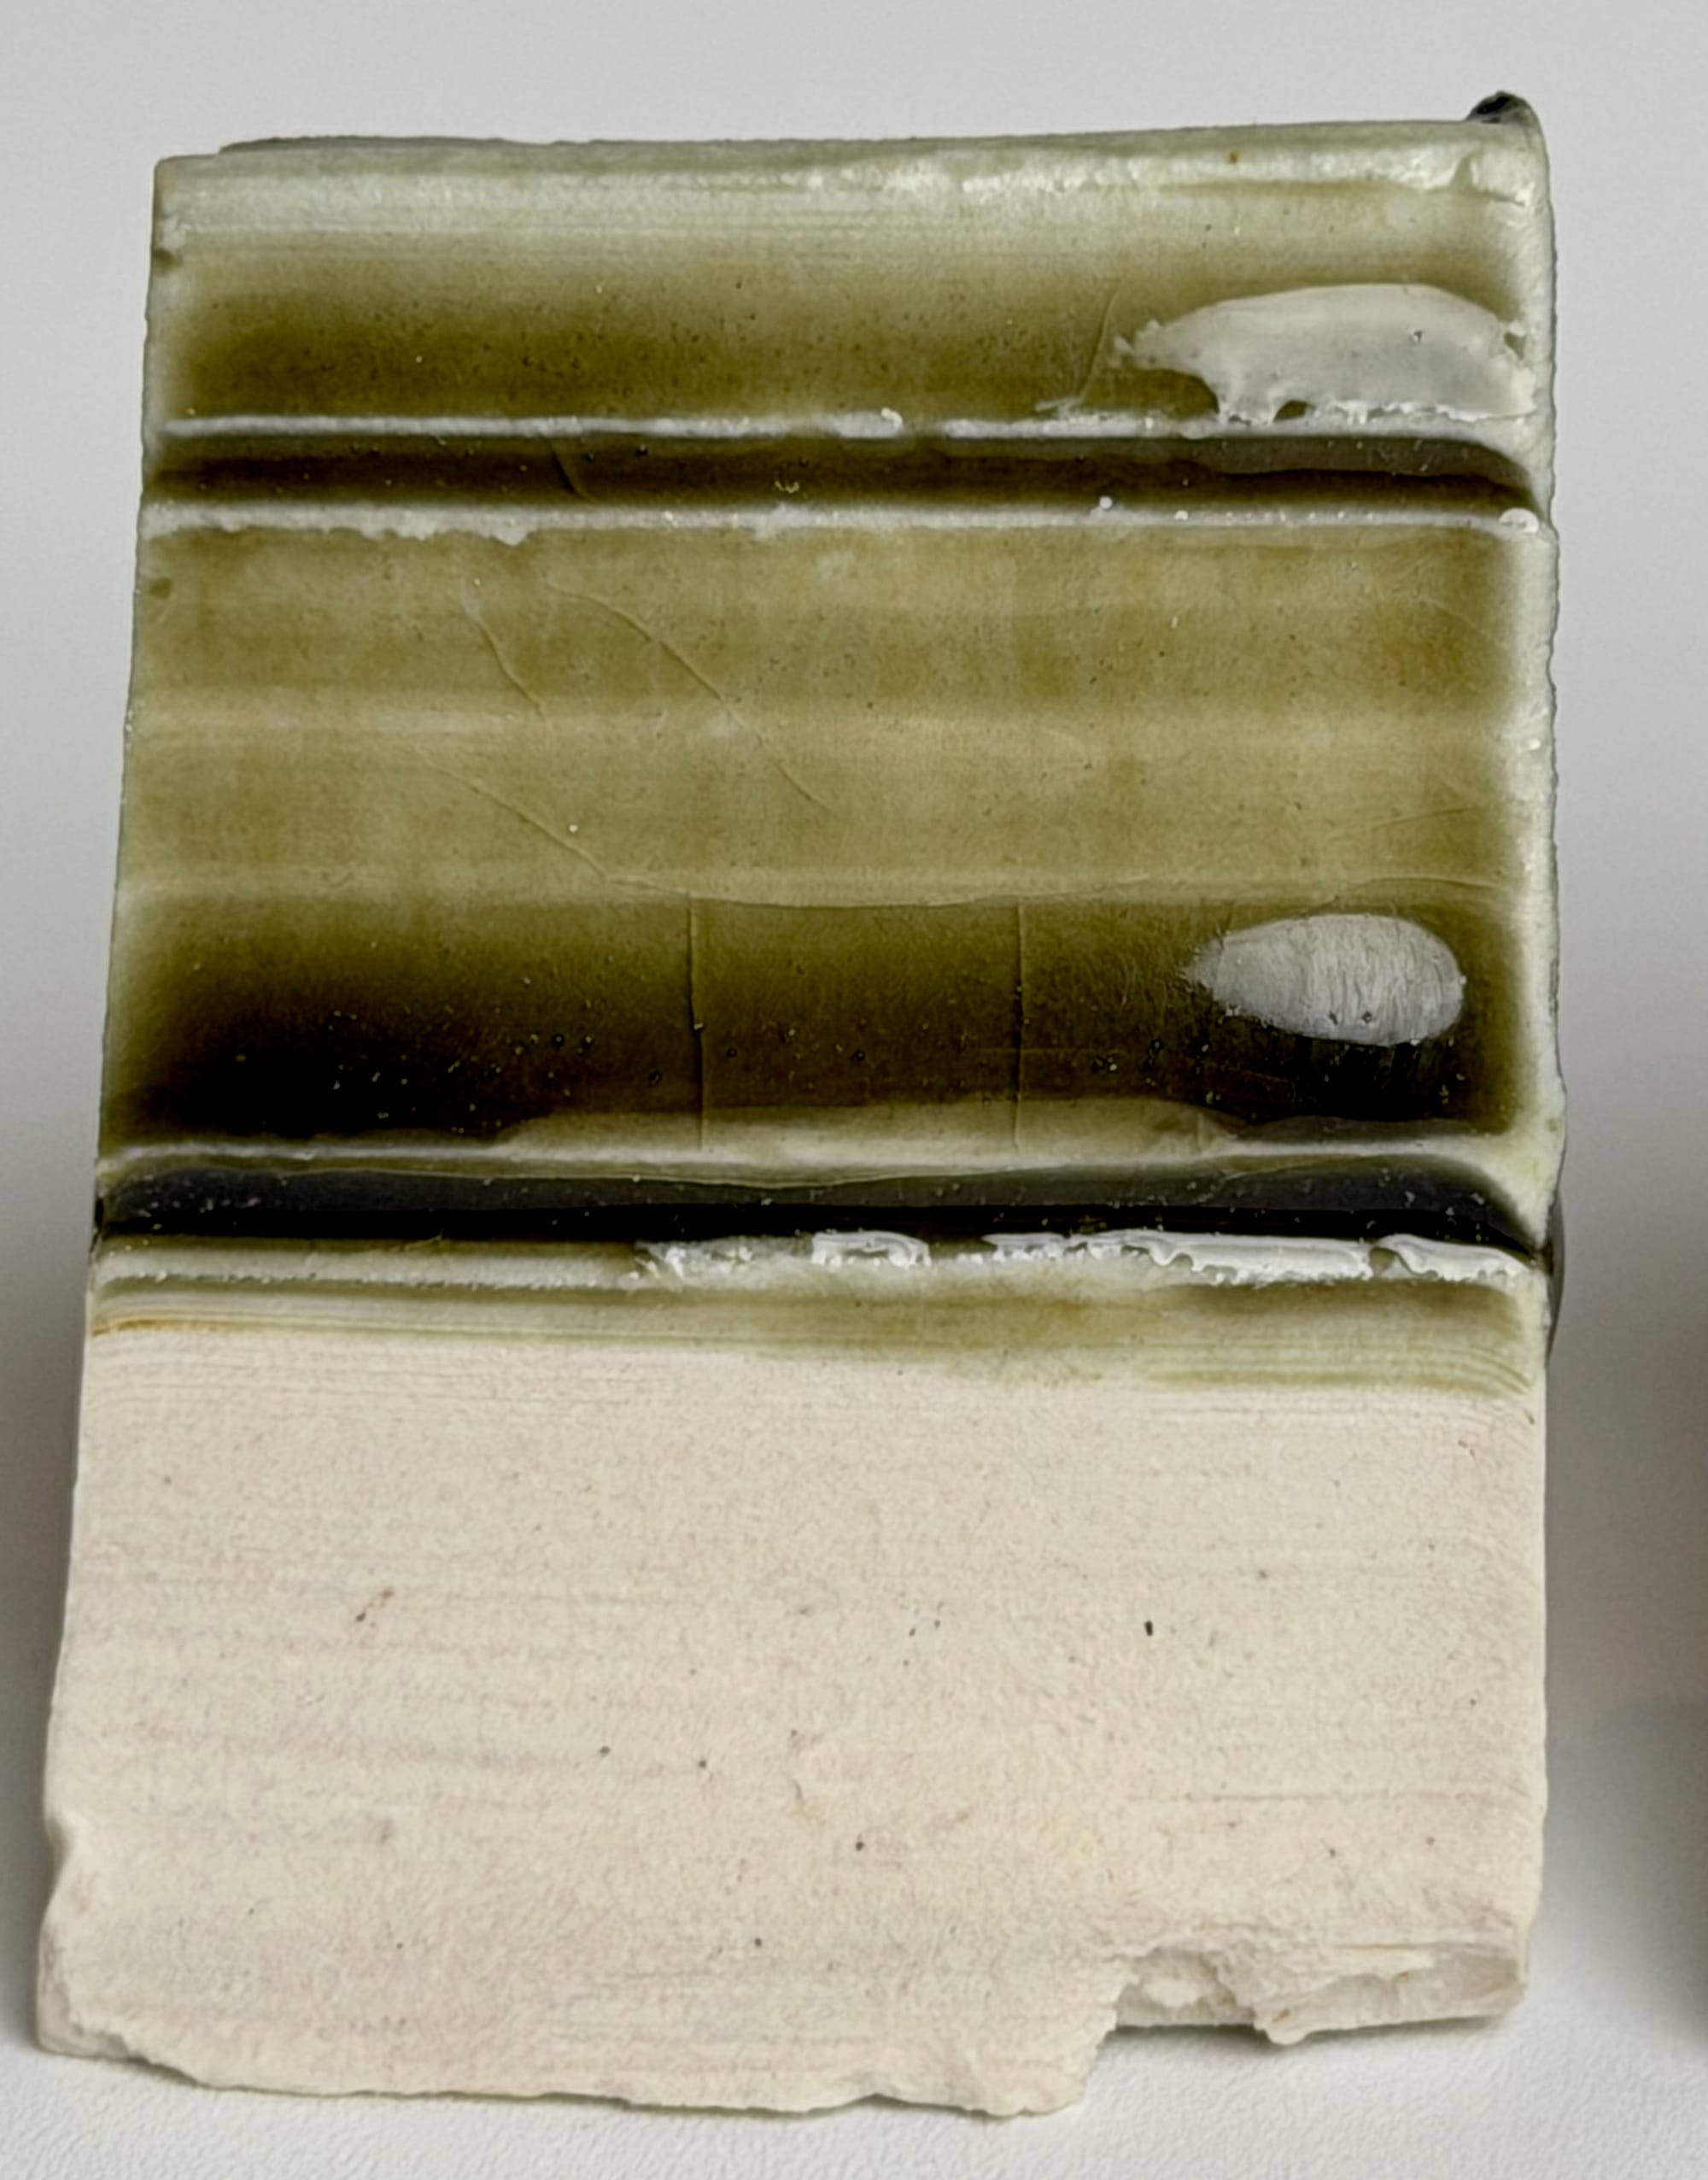
Base-S 100% (left) and Base-Zero 100% (right)
Test Tiles 1 and 11 (above) show our starting points. On the left is Base-S, a honey-colored matte glaze that shows complexity with no crazing. On the right is Base-Z, also honey-colored, but glassy, more melted, more runny, shows micro crystal development where thicker, and is crazed.
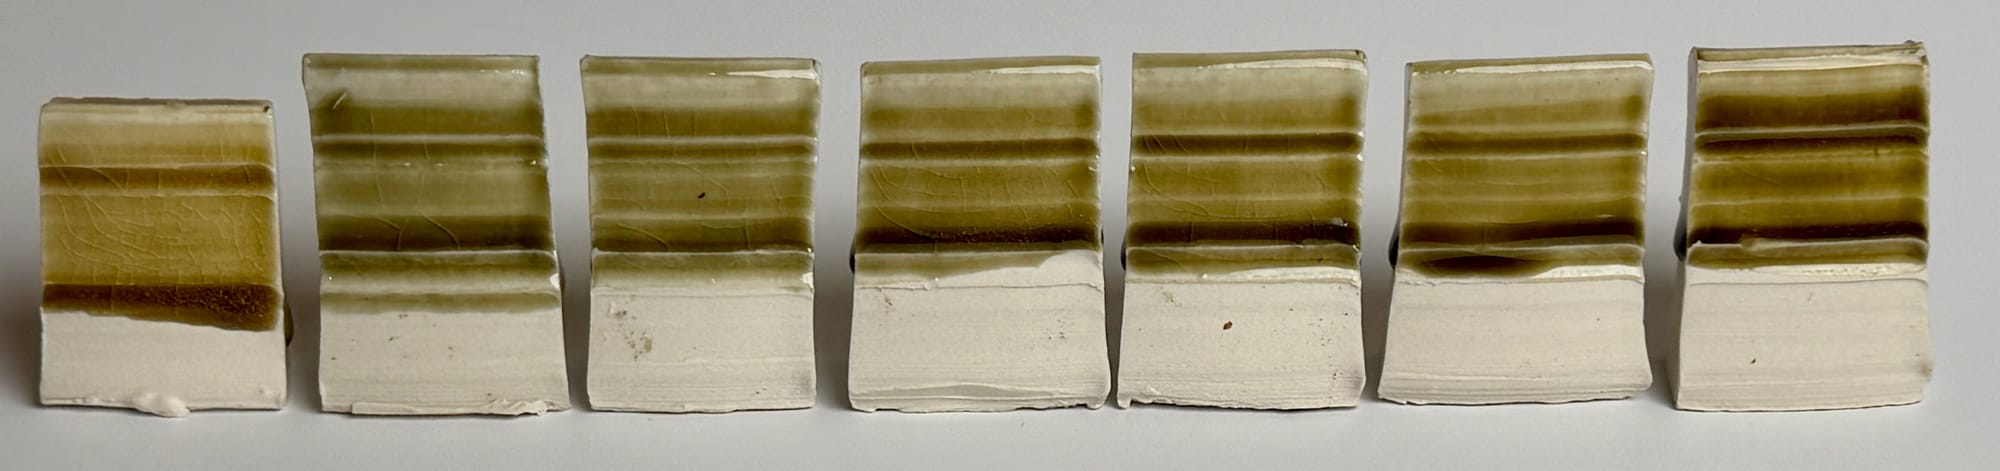
Tile 5 60/40 Base-S/Base-Z (left), Tile 6 50/50 Base-S/Base-Z (right)
The cross-over occurs between Tile 5 (60/40) and Tile 6 (50/50) Base-S to Base-Z (shown above). Tiles 6-11 exhibit crazing while Tiles 1-5 do not. Tile 5 remains matte, appears almost dry in portions, but also clearly has more movement than Tile 1 and, otherwise, is not dissimilar to Tile 1. Likewise, Tile 6 looks more or less identical to Tile 11.
We can conclude, therefore, the boundary we seek likes between Tile 5 and 6, namely between 60/40 and 50/50 Base-S and Base-Z. We also learned that a 50/50 blend has enough flux to melt the glaze fully.
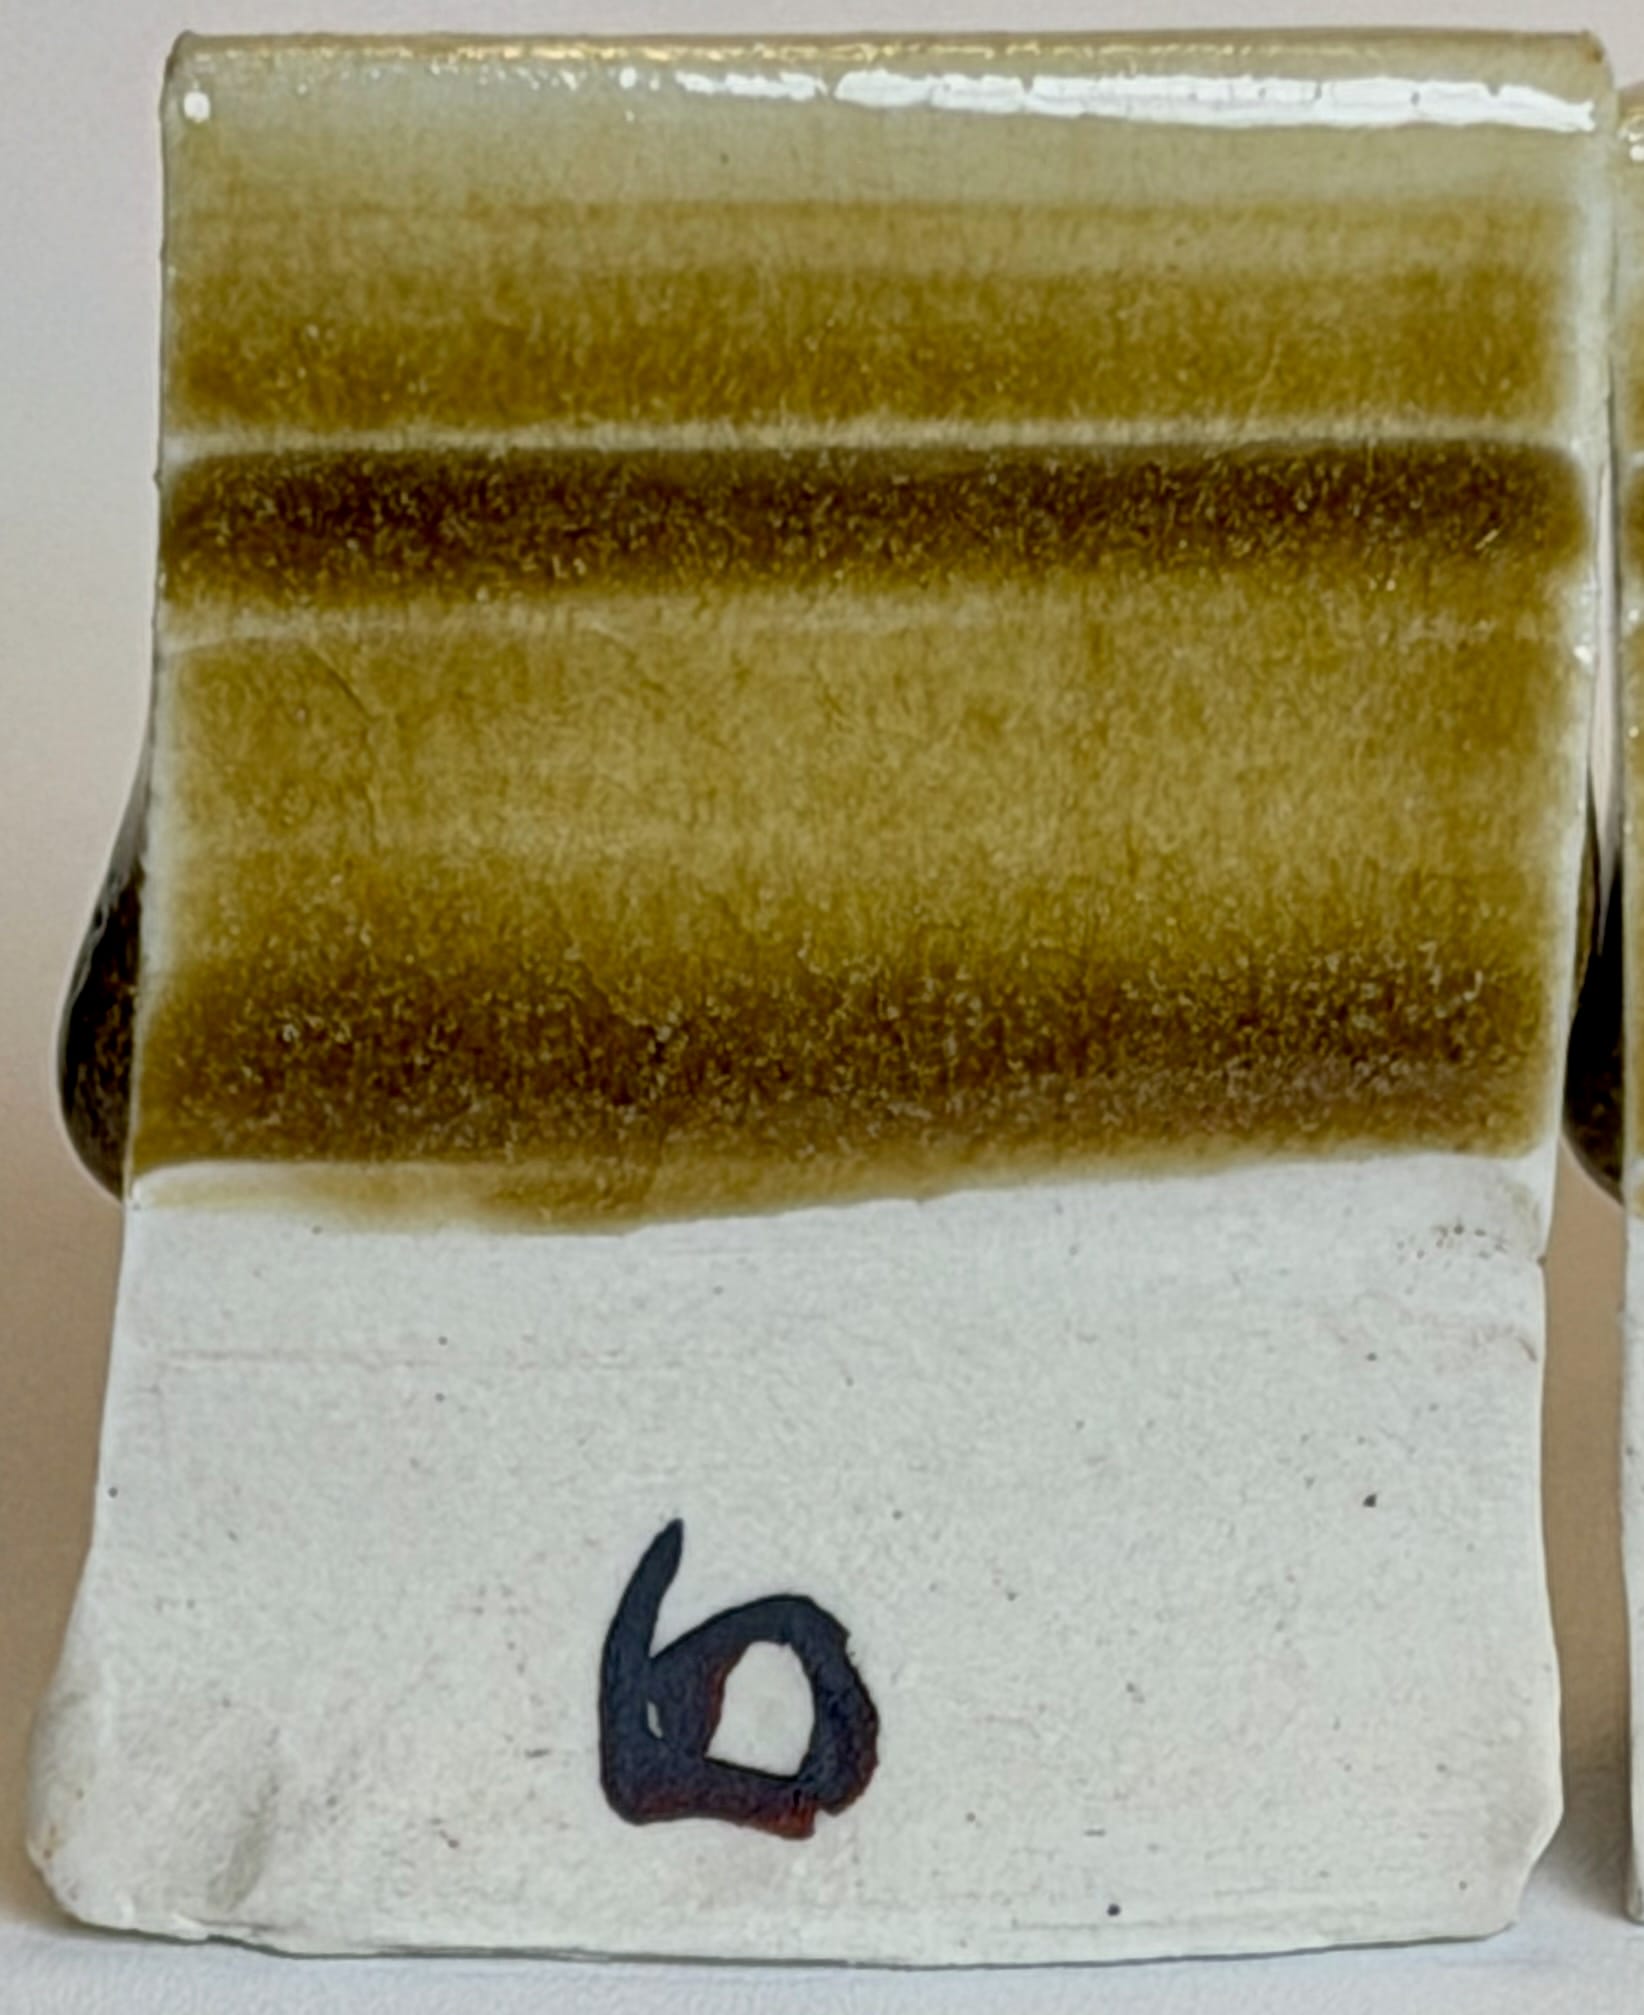
Test 4 - Crazing, Zoomed In
Test 3 was followed by a final line blend that ran between 60/40 and 50/50 Base-S to Base-Z using the following percentages (below).
| Tile | Base-S (%) | Base-Z (%) |
|---|---|---|
| 1 | 58.33 | 41.67 |
| 2 | 56.67 | 43.33 |
| 3 | 55.00 | 45.00 |
| 4 | 53.33 | 46.67 |
| 5 | 51.67 | 48.33 |
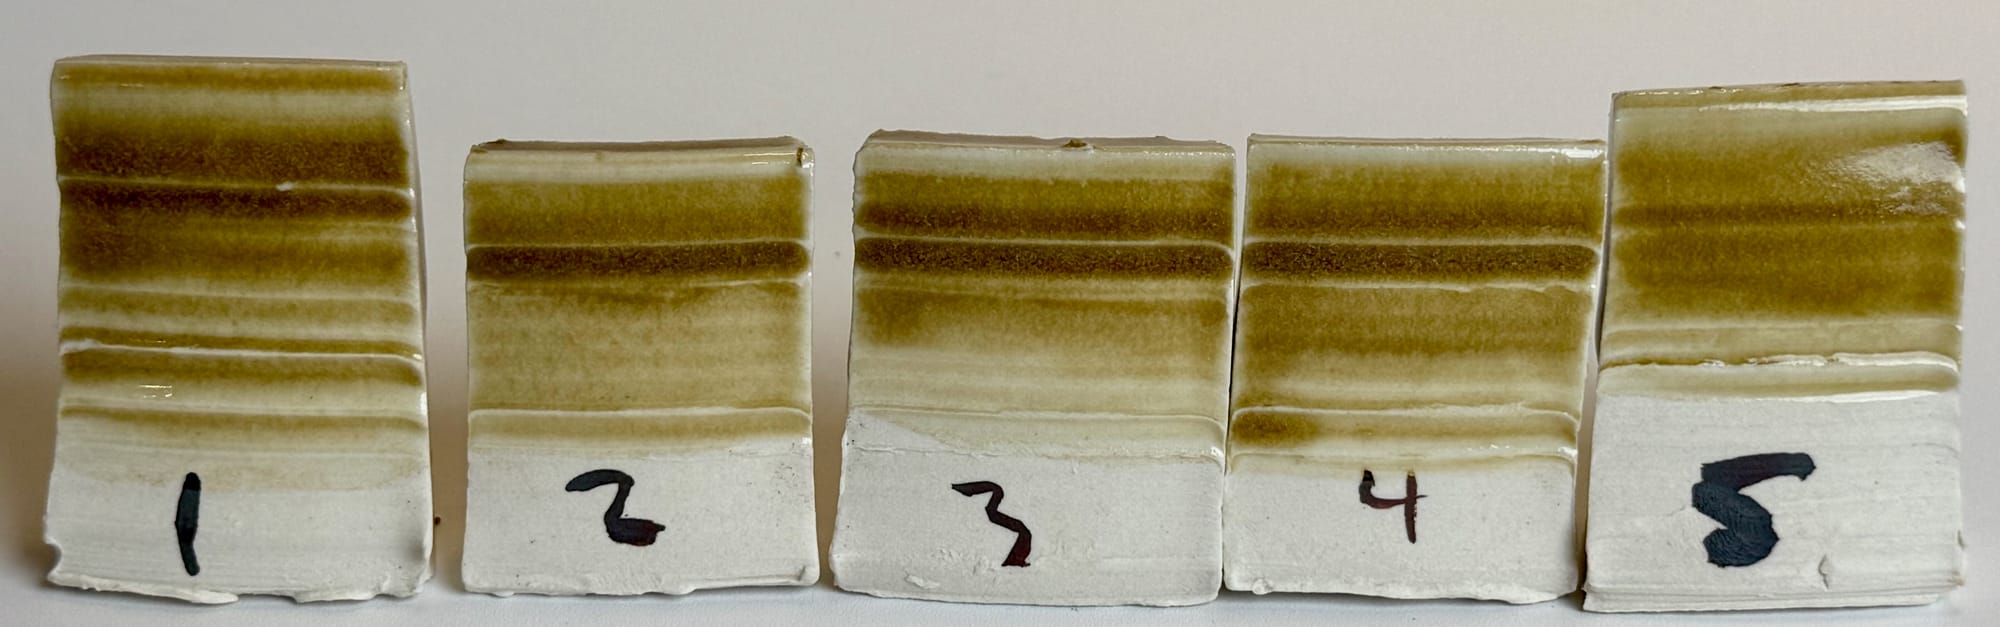
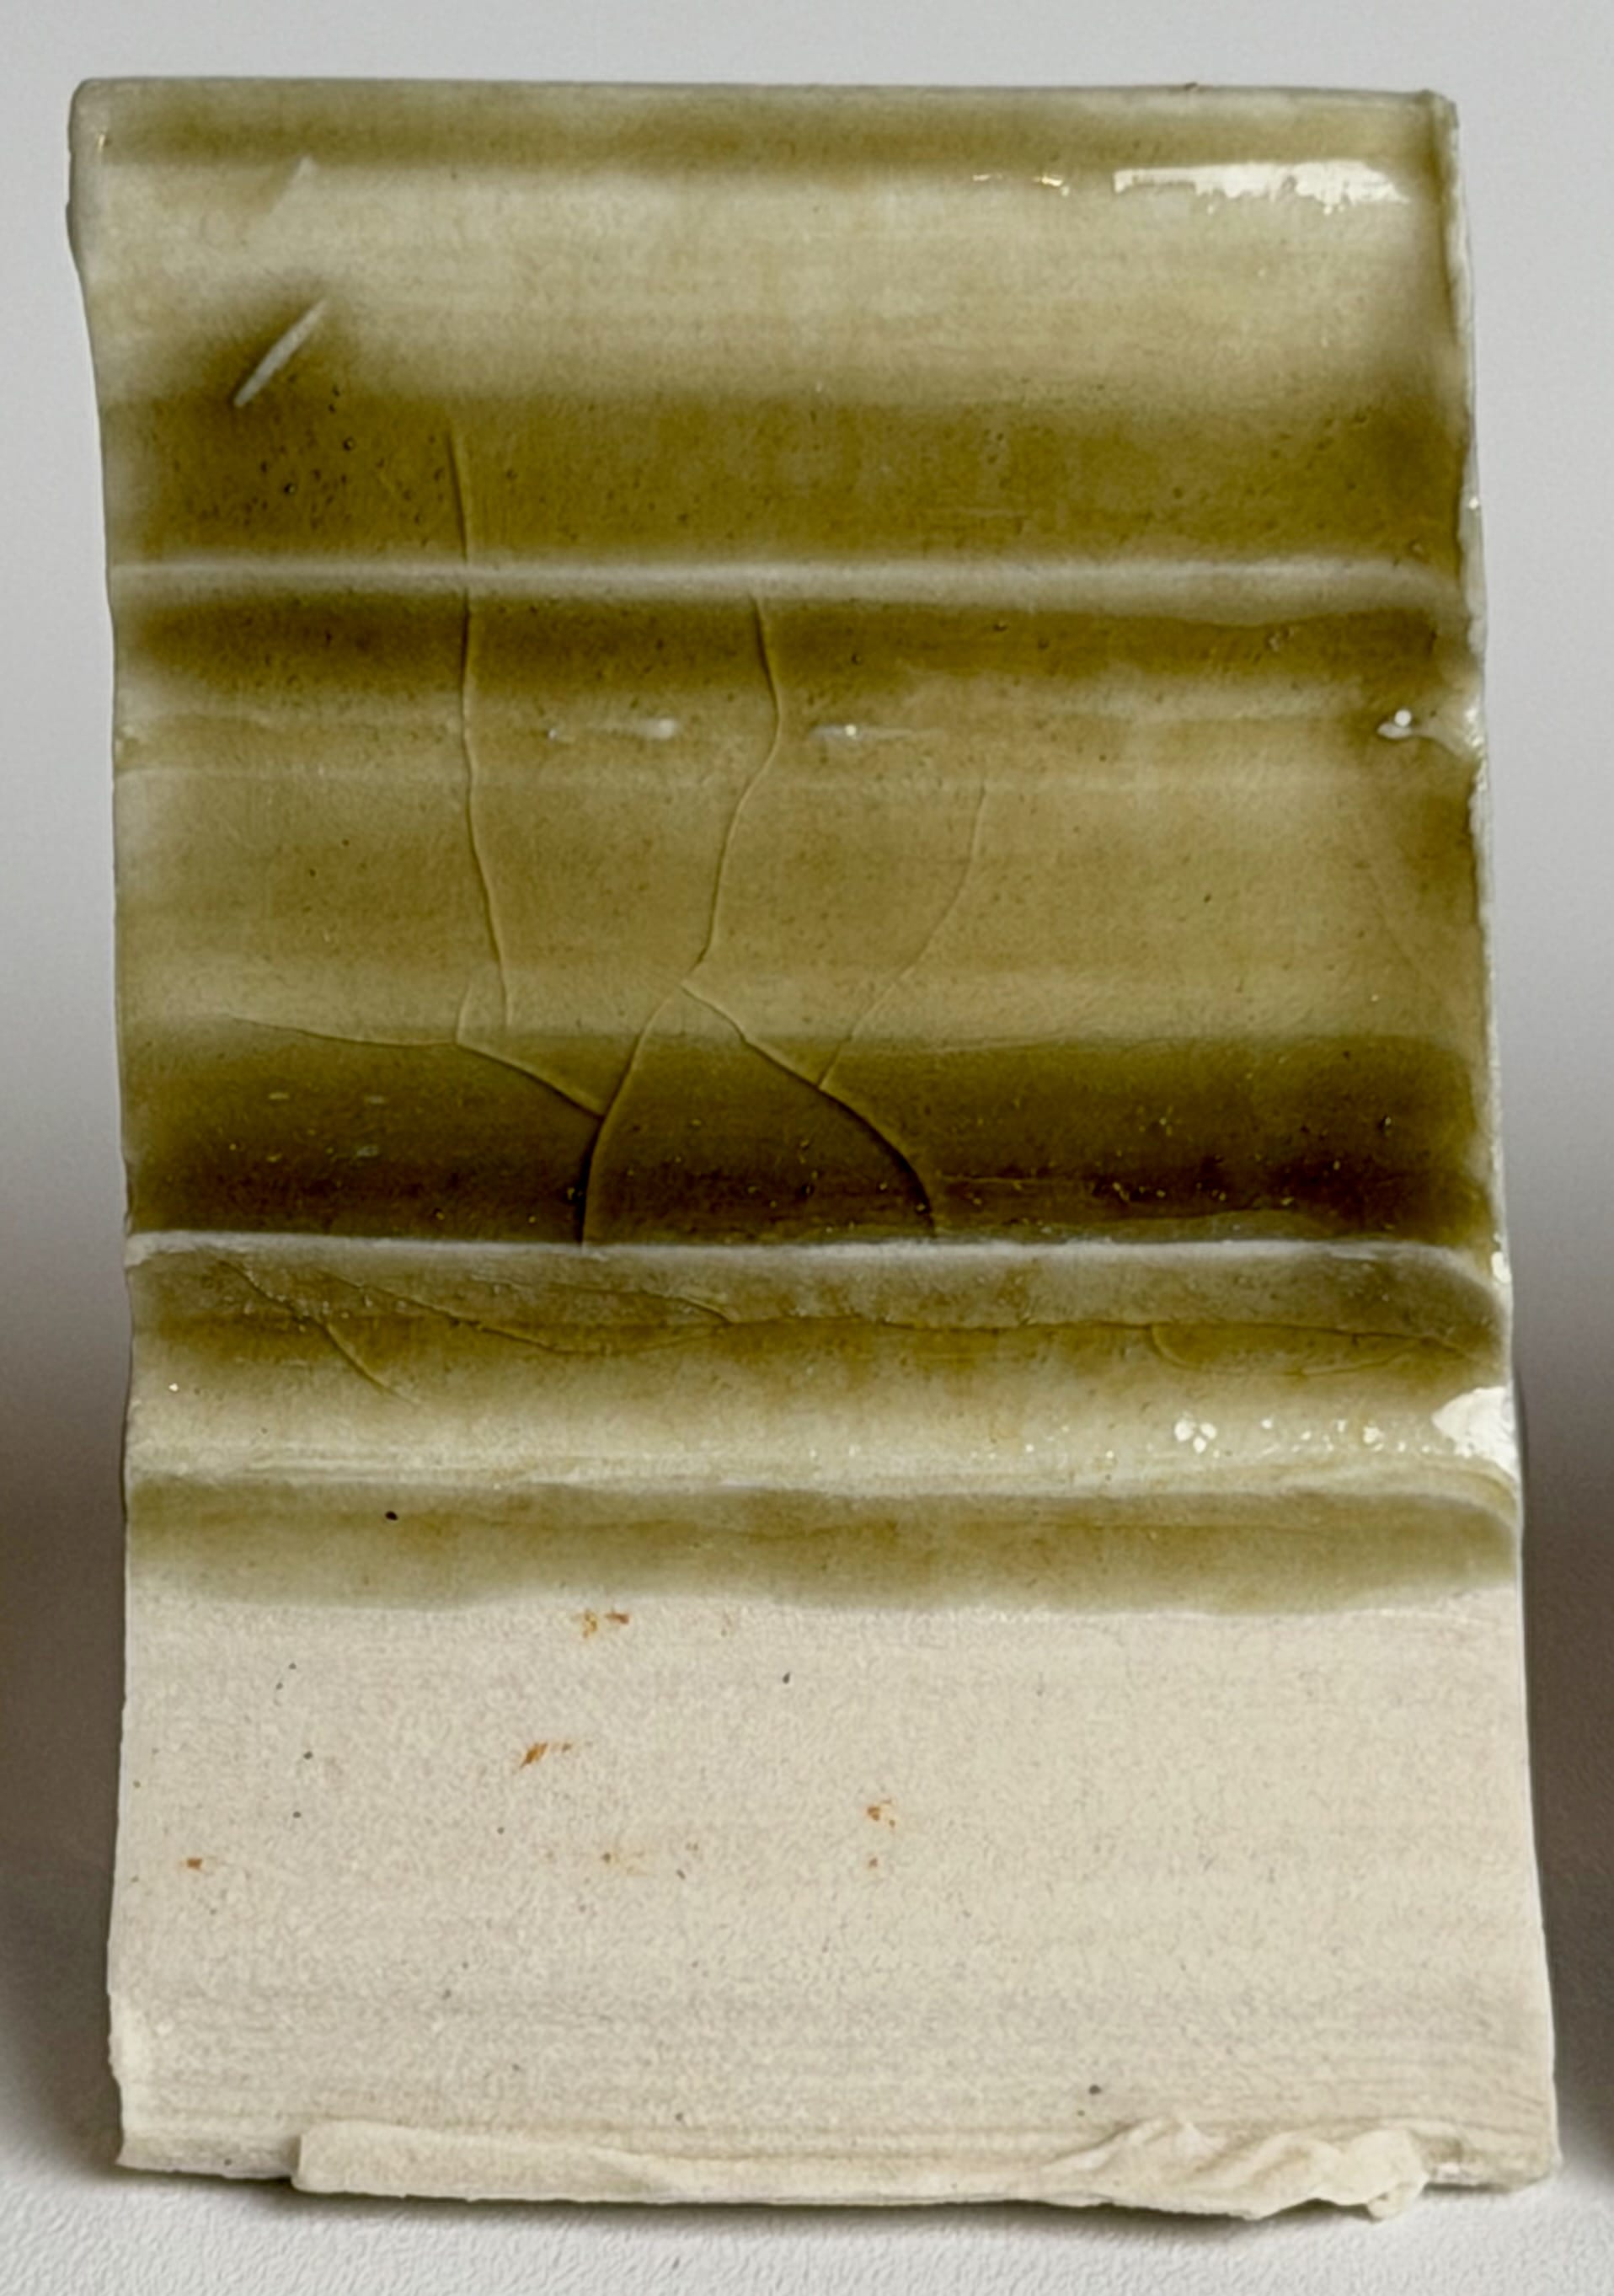
Interestingly, all the tiles appear satin-glassy with no crazing. Instead of finding a peak, we found a plateau where the glaze is melted, well-behaved and fits the porcelain.

Differences between the tiles are subtle, it's hard to tell them apart, but Test 4, Tile 2 (56.7 / 43.3) appears to be the most glassy. In fact Tile 5, the one with the most zinc, turns out to be the most dry and highlights that more flux does always translate to more melted.
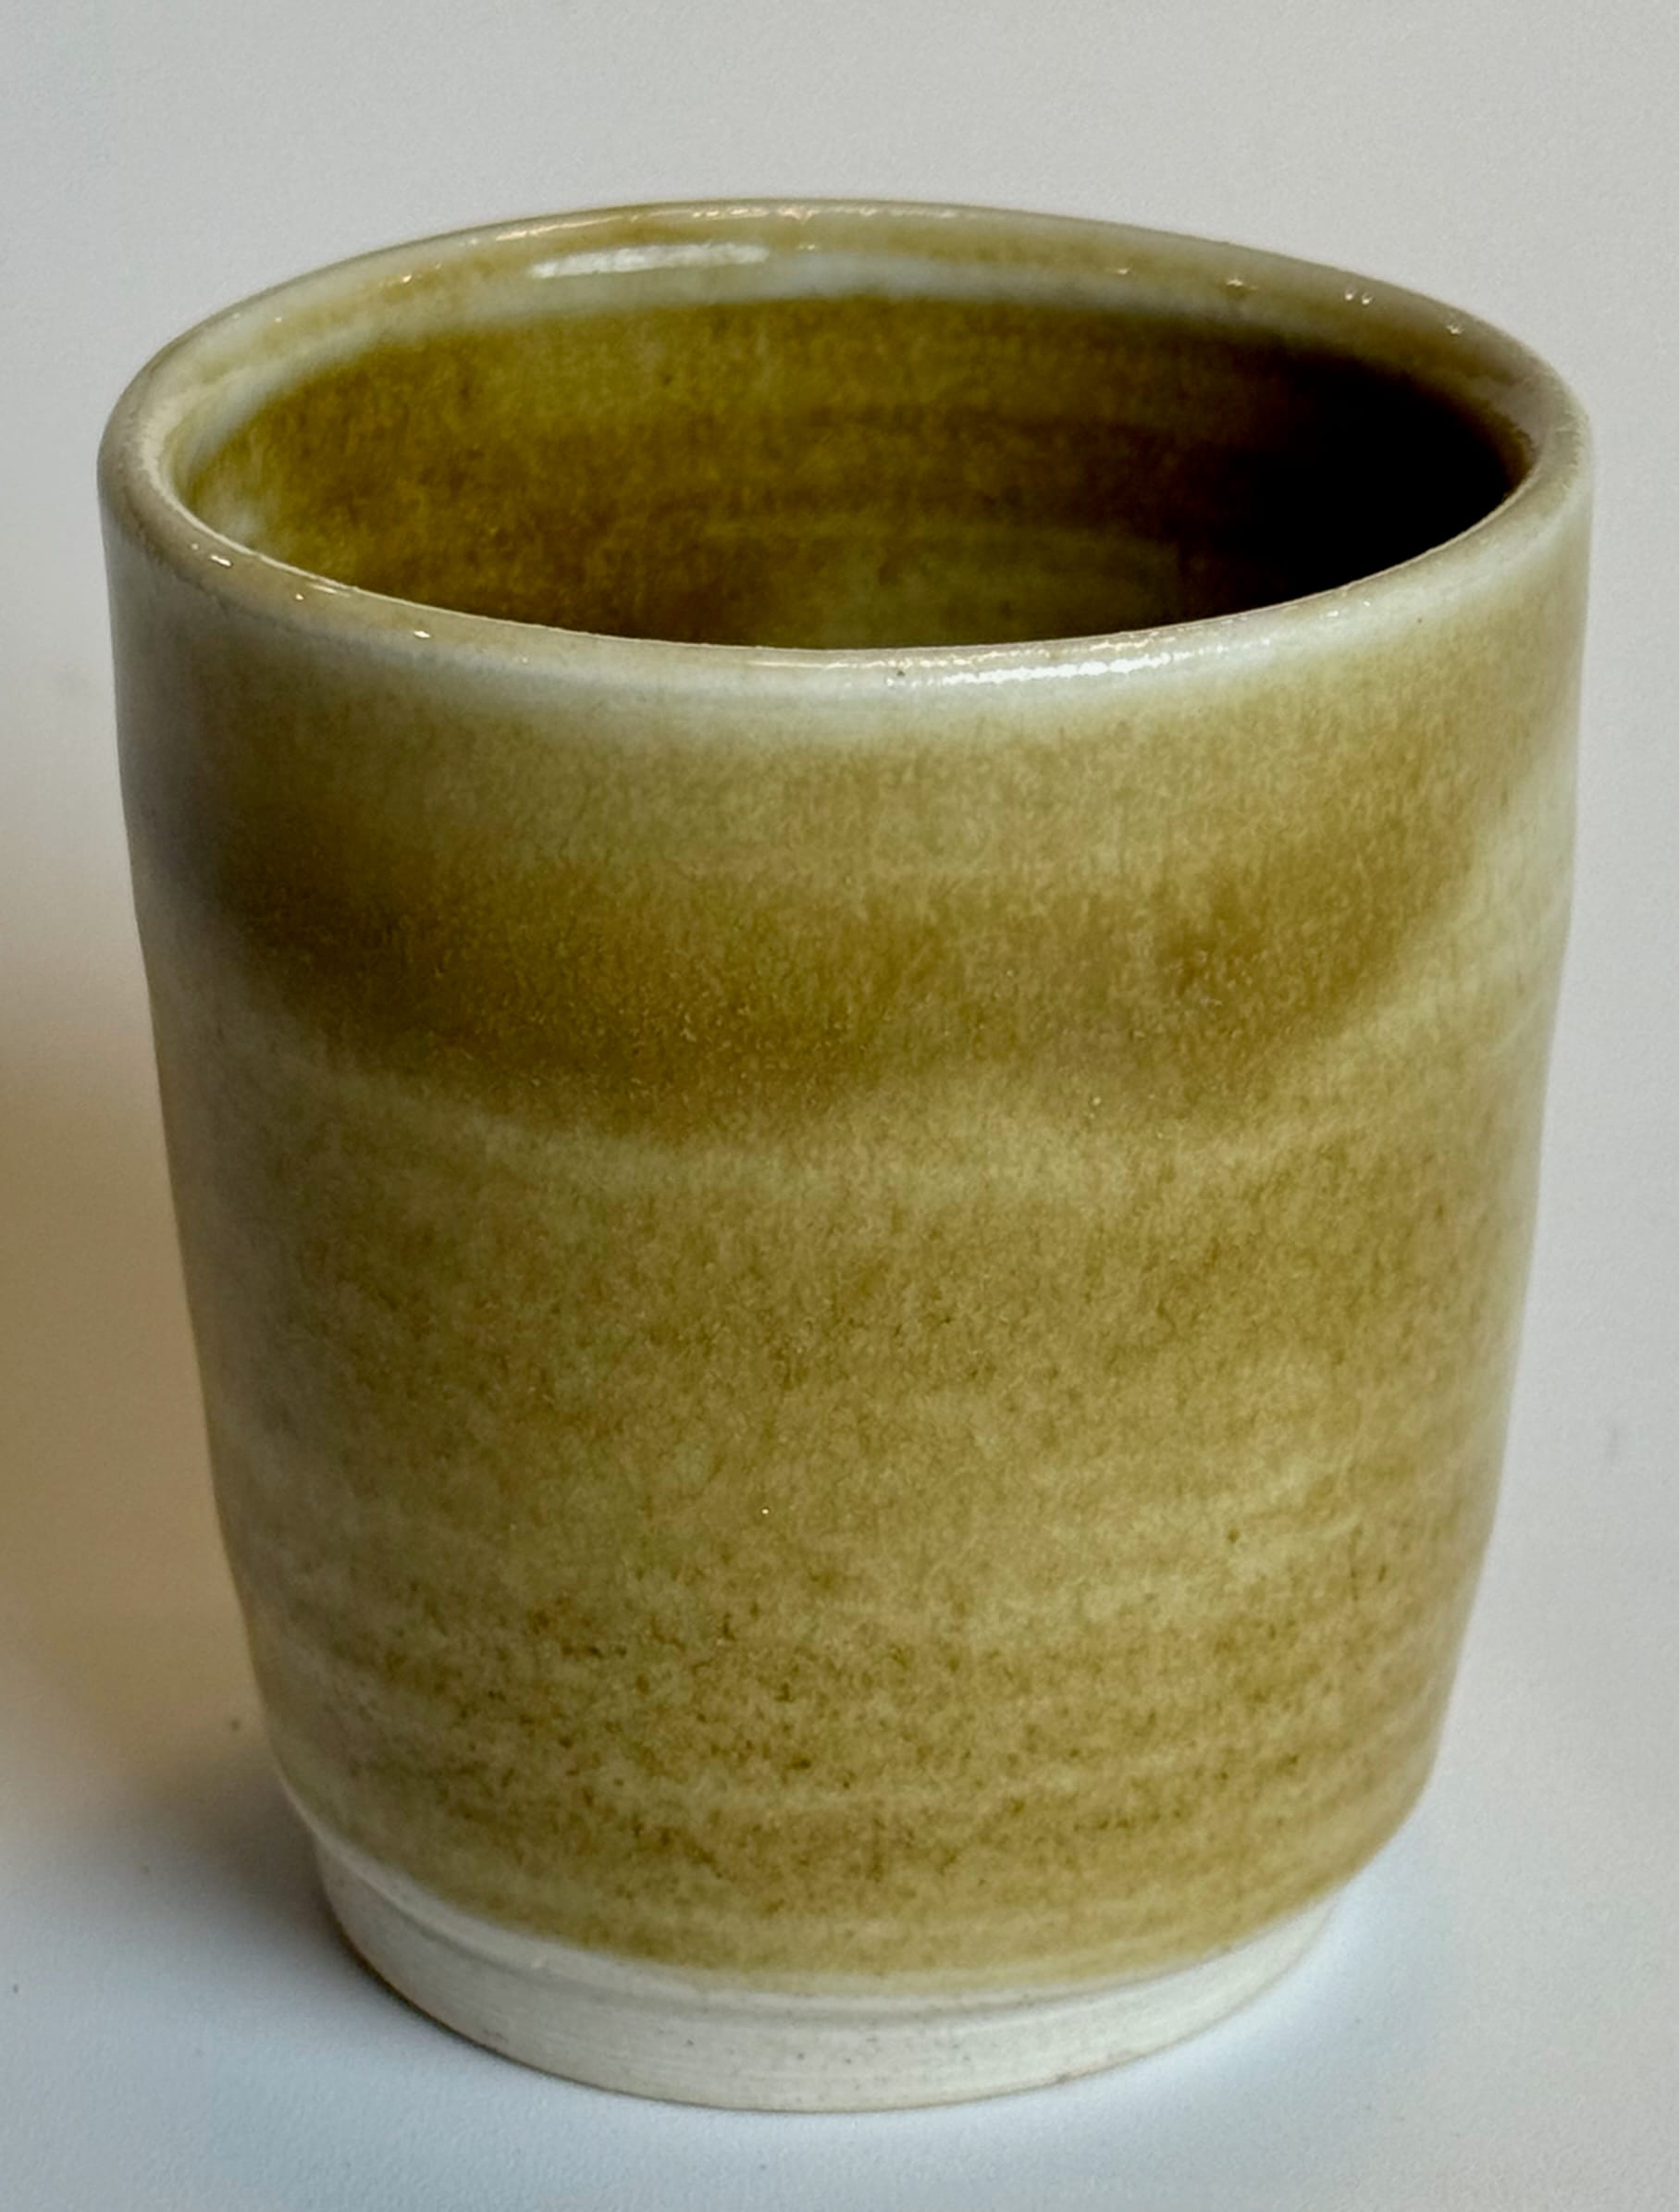
After the line blend setup was complete, the remaining glaze was combined and used on the cup presented above. This would correspond to Test 4, Tile 3 (55 / 45 Base-S to Base-Z). It's a melted, glassy glaze that exhibits some welcome movement where thicker, is not crazed, and corresponds to the following glaze recipe.
| Material | % | % |
|---|---|---|
| MV Granite | 70 | 65.24 |
| Wollastonite | 30 | 27.96 |
| Silica | 5.5 | 5.13 |
| Zinc Oxide | 1.8 | 1.68 |